Substrate Recipes 🍴😋🍴
A Hands-On Cookbook for Aspiring Blockchain Chefs
Substrate Recipes is a cookbook of working examples that demonstrate best practices when building blockchains with Substrate. Each recipe contains complete working code as well as a detailed writeup explaining the code.
How to Use This Book
You can read this book in any particular order. If you have a certain topic you want to dive into, or know the subject/keyword to look for, please use the search button (the small magnifier on top left) to search for the subject. The list is organized roughly in order of increasing complexity.
You can't learn to build blockchains by reading alone. As you work through the recipes, practice compiling, testing, and hacking on each Recipes. Play with the code, extract patterns, and apply them to a problem that you want to solve!
If you haven't already, you should probably clone this repository right now.
git clone https://github.com/substrate-developer-hub/recipes.git
Getting Help
When learning any new skill, you will inevitably get stuck at some point. When you do get stuck you can seek help in several ways:
- Ask a question on Stack Overflow
- Ask a question in the Substrate Technical Element channel
- Open a new issue against this repository
Prerequisites
Each recipe targets a specific aspect of Substrate development and explains the details of that aspect. In all recipes some basic familiarity with Substrate development and a working Rust environment are assumed. Generally speaking you should meet the following prerequisites:
- Have a working Substrate development environment. There are excellent docs on setting up a Substrate development environment.
- Understand the first ten chapters of The Rust Book. Rather than learning Rust before you learn Substrate, consider learning Rust as you learn Substrate.
- Complete the first few Official Substrate Tutorials.
Structure of a Substrate Node
It is useful to recognize that coding is all about abstraction.
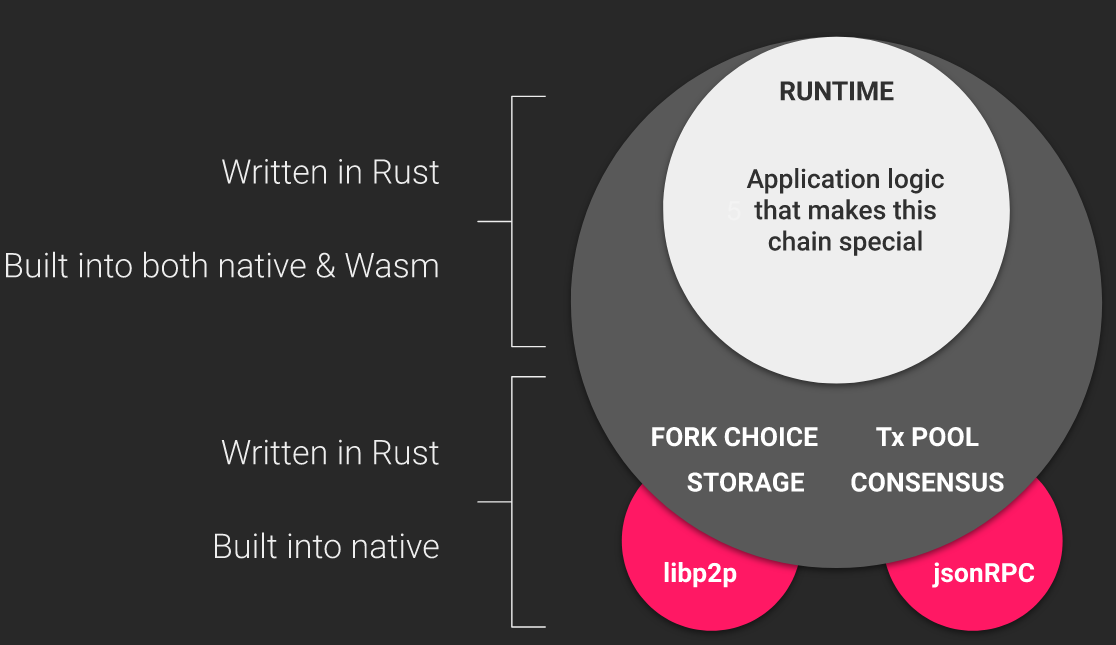
To understand how the code in this repository is organized, let's first take a look at how a Substrate node is constructed. Each node has many components that manage things like the transaction queue, communicating over a P2P network, reaching consensus on the state of the blockchain, and the chain's actual runtime logic. Each aspect of the node is interesting in its own right, and the runtime is particularly interesting because it contains the business logic (aka "state transition function") that codifies the chain's functionality.
Much, but not all, of the Recipes focuses on writing runtimes with FRAME, Parity's Framework for composing runtimes from individual building blocks called Pallets. Runtimes built with FRAME typically contain several such pallets. The kitchen node you built previously follows this paradigm.
The Directories in our Kitchen
If you haven't already, you should clone it now. There are five primary directories in this repository.
- Consensus: Consensus engines for use in Substrate nodes.
- Nodes: Complete Substrate nodes ready to run.
- Pallets: Pallets for use in FRAME-based runtimes.
- Runtimes: Runtimes for use in Substrate nodes.
- Text: Source of the book written in markdown. This is what you're reading right now.
Exploring those directories reveals a tree that looks like this
recipes
|
+-- consensus
  |
  +-- manual-seal
  |
  +-- sha3pow
|
+-- nodes
	|
	+-- basic-pow
	|
	+-- ...
	|
	+-- rpc-node
|
+-- pallets
	|
	+-- basic-token
	|
	+ ...
	|
	+-- weights
|
+-- runtimes
	|
	+-- api-runtime
	|
	+ ...
	|
	+-- weight-fee-runtime
|
+-- text
Inside the Kitchen Node
Let us take a deeper look at the Kitchen Node.
Looking inside the Kitchen Node's Cargo.toml file we see that it has many dependencies. Most of
them come from Substrate itself. Indeed most parts of this Kitchen Node are not unique or
specialized, and Substrate offers robust implementations that we can use. The runtime does not come
from Substrate. Rather, we use our super-runtime which is in the runtimes folder.
nodes/kitchen-node/Cargo.toml
# This node is compatible with any of the runtimes below
# ---
# Common runtime configured with most Recipes pallets.
runtime = { package = "super-runtime", path = "../../runtimes/super-runtime" }

# Runtime with custom weight and fee calculation.
# runtime = { package = "weight-fee-runtime", path = "../../runtimes/weight-fee-runtime"}

# Runtime with off-chain worker enabled.
# To use this runtime, compile the node with `ocw` feature enabled,
#   `cargo build --release --features ocw`.
# runtime = { package = "ocw-runtime", path = "../../runtimes/ocw-runtime" }

# Runtime with custom runtime-api (custom API only used in rpc-node)
# runtime = { package = "api-runtime", path = "../../runtimes/api-runtime" }
# ---
The commented lines, quoted above, show that the Super Runtime is not the only runtime we could have chosen. We could also use the Weight-Fee runtime, and I encourage you to try that experiment (remember, instructions to re-compile the node are in the previous section).
Every node must have a runtime. You may confirm that by looking at the Cargo.toml files of the
other nodes included in our kitchen.
Inside the Super Runtime
Having seen that the Kitchen Node depends on a runtime, let us now look deeper at the Super Runtime.
runtimes/super-runtime/Cargo.toml
# -- snip --

# Substrate Pallets
balances = { package = 'pallet-balances', , ... }
transaction-payment = { package = 'pallet-transaction-payment', ,... }
# Recipe Pallets
adding-machine = { path = "../../pallets/adding-machine", default-features = false }
basic-token = { path = "../../pallets/basic-token", default-features = false }
Here we see that the runtime depends on many pallets. Some of these pallets come from Substrate itself. Indeed, Substrate offers a rich collection of commonly used pallets which you may use in your own runtimes. This runtime also contains several custom pallets that are written right here in our Kitchen.
Common Patterns
We've just observed the general pattern used throughout the recipes. From the inside out, we see a
piece of pallet code stored in pallets/<pallet-name>/src/lib.rs. The pallet is then included into
a runtime by adding its name and relative path in runtimes/<runtime-name>/Cargo.toml. That runtime
is then installed in a node by adding its name and relative path in nodes/<node-name>/Cargo.toml.
Some recipes explore aspects of Blockchain development that are outside of the runtime. Looking back to our node architecture at the beginning of this section, you can imagine that changing a node's RPC or Consensus would be conceptually similar to changing its runtime.
Pallets
Pallets are individual pieces of runtime logic for use in FRAME runtimes. Learn about them in this section of the cookbook.
Hello Substrate
pallets/hello-substrate
This pallet has one dispatchable call that prints a message to the node's output. Printing to the node log is not common for runtimes, but can be quite useful when debugging and as a "hello world" example. Because this is the first pallet in the recipes, we'll also take a look at the general structure of a pallet.
No Std
The very first line of code tells the rust compiler that this crate should not use rust's standard library except when explicitly told to. This is useful because Substrate runtimes compile to Web Assembly where the standard library is not available.
#![cfg_attr(not(feature = "std"), no_std)]
Imports
Next, you'll find imports that come from various parts of the Substrate framework. All pallets will
import from a few common crates including
frame-support, and
frame-system. Complex pallets will have many
imports. The hello-substrate pallet uses these imports.
use frame_support::{debug, decl_module, dispatch::DispatchResult};
use frame_system::ensure_signed;
use sp_runtime::print;
Tests
Next we see a reference to the tests module. This pallet, as with most recipes pallets, has tests written in a separate file called
tests.rs.
Configuration Trait
Next, each pallet has a configuration trait which is called Config. The configuration trait can be
used to access features from other pallets, or constants that affect
the pallet's behavior. This pallet is simple enough that our configuration trait can remain empty,
although it must still exist.
pub trait Config: frame_system::Config {}
Dispatchable Calls
A Dispatchable call is a function that a blockchain user can call as part of an Extrinsic.
"Extrinsic" is Substrate jargon meaning a call from outside of the chain. Most of the time they are
transactions, and for now it is fine to think of them as transactions. Dispatchable calls are
defined in the
decl_module! macro.
decl_module! {
	pub struct Module<T: Config> for enum Call where origin: T::Origin {

		/// A function that says hello to the user by printing messages to the node log
		#[weight = 10_000]
		pub fn say_hello(origin) -> DispatchResult {
			// --snip--
		}

		// More dispatchable calls could go here
	}
}
As you can see, our hello-substrate pallet has a dispatchable call that takes a single argument,
called origin. The call returns a
DispatchResult which
can be either Ok(()) indicating that the call succeeded, or an Err which is demonstrated in most other recipes pallets.
Weight Annotations
Right before the hello-substrate function, we see the line #[weight = 10_000]. This line
attaches a default weight to the call. Ultimately weights affect the fees a user will have to pay to
call the function. Weights are a very interesting aspect of developing with Substrate, but they too
shall be covered later in the section on Weights. For now, and for many of
the recipes pallets, we will simply use the default weight as we have done here.
Inside a Dispatchable Call
Let's take a closer look at our dispatchable call.
#[pallet::weight(10_000)]
pub fn say_hello(origin: OriginFor<T>) -> DispatchResultWithPostInfo {
	// Ensure that the caller is a regular keypair account
	let caller = ensure_signed(origin)?;

	// Print a message
	print("Hello World");
	// Inspecting a variable as well
	debug::info!("Request sent by: {:?}", caller);

	// Indicate that this call succeeded
	Ok(().into())
}
This function essentially does three things. First, it uses the
ensure_signed function to ensure
that the caller of the function was a regular user who owns a private key. This function also
returns who that caller was. We store the caller's identity in the caller variable.
Second, it prints a message and logs the caller. Notice that we aren't using Rust's normal
println! macro, but rather a special
print function and
debug::info! macro. The reason for
this is explained in the next section.
Finally, the call returns Ok(()) to indicate that the call has succeeded. At a glance it seems
that there is no way for this call to fail, but this is not quite true. The ensure_signed
function, used at the beginning, can return an error if the call was not from a signed origin. This
is the first time we're seeing the important paradigm "Verify first, write last". In Substrate
development, it is important that you always ensure preconditions are met and return errors at the
beginning. After these checks have completed, then you may begin the function's computation.
Printing from the Runtime
Printing to the terminal from a Rust program is typically very simple using the println! macro.
However, Substrate runtimes are compiled to both Web Assembly and a regular native binary, and do
not have access to rust's standard library. That means we cannot use the regular println!. I
encourage you to modify the code to try using println! and confirm that it will not compile.
Nonetheless, printing a message from the runtime is useful both for logging information, and also
for debugging.

At the top of our pallet, we imported sp_runtime's
print function. This special function allows
the runtime to pass a message for printing to the outer part of the node which is not compiled to
Wasm and does have access to the standard library and can perform regular IO. This function is only
able to print items that implement the
Printable trait. Luckily all
the primitive types already implement this trait, and you can implement the trait for your own
datatypes too.
Print function note: To actually see the printed messages, we need to use the flag
-lruntime=debug when running the kitchen node. So, for the kitchen node, the command would become
./target/release/kitchen-node --dev -lruntime=debug.
The next line demonstrates using debug::info! macro to log to the screen and also inspecting the
variable's content. The syntax inside the macro is very similar to what regular rust macro
println! takes.
You can specify the logger target with
debug::debug!(target: "mytarget", "called by {:?}", sender);
Now you can filter logs with
kitchen-node --dev -lmytarget=debug
If you do not specify the logger target, it will be set to the crate's name (not to runtime!).
Runtime logger note: When we execute the runtime in native, debug::info! messages are printed.
However, if we execute the runtime in Wasm, then an additional step to initialise
RuntimeLogger is required:
debug::RuntimeLogger::init();
You'll need to call this inside every pallet dispatchable call before logging.
Using Events
pallets/simple-event
pallets/generic-event
Having a transaction included in a block does not guarantee that the function executed successfully. To verify that functions have executed successfully, emit an event at the bottom of the function body.
Events notify the off-chain world of successful state transitions.
Some Prerequisites
When using events, we have to include the Event type in our configuration trait. Although the
syntax is a bit complex, it is the same every time. If you are a skilled Rust programmer you will
recognize this as a series of trait bounds. If
you don't recognize this feature of Rust yet, don't worry; it is the same every time, so you can
just copy it and move on.
#[pallet::config]
pub trait Config: frame_system::Config {
	/// Because this pallet emits events, it depends on the runtime's definition of an event.
	type Event: From<Event<Self>> + IsType<<Self as frame_system::Config>::Event>;
}
Next we have to add a line of the #[pallet::generate_deposit(pub(super) fn deposit_event)] macro which generates the deposit_event
function we'll use later when emitting our events. Even experienced Rust programmers will not
recognize this syntax because it is unique to this macro. Just copy it each time.
#[pallet::event]
#[pallet::metadata(T::AccountId = "AccountId")]
#[pallet::generate_deposit(pub(super) fn deposit_event)]
pub enum Event<T: Config> {
	/// Event documentation should end with an array that provides descriptive names for event
	/// parameters. [something, who]
	EmitInput(u32),
}
Declaring Events
To declare an event, use the
#[pallet::event] macro. Like any rust
enum, Events have names and can optionally carry data with them. The syntax is slightly different
depending on whether the events carry data of primitive types, or generic types from the pallet's
configuration trait. These two techniques are demonstrated in the simple-event and generic-event
pallets respectively.
Simple Events
The simplest example of an event uses the following syntax
#[pallet::event]
#[pallet::metadata(u32 = "Metadata")]
pub enum Event<T: Config> {
    /// Set a value.
    ValueSet(u32, T::AccountId),
}
Events with Generic Types
Sometimes, events might contain types from the pallet's Configuration Trait. In this case, it is necessary to specify additional syntax:
#[pallet::event]
pub enum Event<T: Config> {
	EmitInput(u32),
}
This example also demonstrates how the where clause can be used to specify type aliasing for more
readable code.
Emitting Events
Events are emitted from dispatchable calls using the deposit_event method.
Events are not emitted on block 0. So any dispatchable calls made during genesis block formation will have no events emitted.
Simple Events
The event is emitted at the bottom of the do_something function body.
Self::deposit_event(Event::EmitInput(new_number));
Events with Generic Types
The syntax for deposit_event now takes the RawEvent type because it is generic over the pallet's
configuration trait.
#[pallet::generate_deposit(pub(super) fn deposit_event)]
Constructing the Runtime
For the first time in the recipes, our pallet has an associated type in its configuration trait. We
must specify this type when implementing its trait. In the case of the Event type, this is
entirely straight forward, and looks the same for both simple events and generic events.
impl simple_event::Config for Runtime {
	type Event = Event;
}
Events, like dispatchable calls and storage items, requires a slight change to the line in
construct_runtime!. Notice that the <T> is necessary for generic events.
construct_runtime!(
	pub enum Runtime where
		Block = Block,
		NodeBlock = opaque::Block,
		UncheckedExtrinsic = UncheckedExtrinsic
	{
		// --snip--
		GenericEvent: generic_event::{Module, Call, Event<T>},
		SimpleEvent: simple_event::{Module, Call, Event},
	}
);
Storage Maps
pallets/simple-map
In this recipe, we will see how
to store a mapping from keys to values, similar to Rust's own
HashMap.
Declaring a StorageMap
We declare a single storage map with the following syntax:
#[pallet::storage]
#[pallet::getter(fn simple_map)]
	pub(super) type SimpleMap<T: Config> =
	StorageMap<_, Blake2_128Concat, T::AccountId, u32, ValueQuery>;
Much of this should look familiar to you from storage values. Reading the line from left to right we have:
SimpleMap- the name of the storage mapget(fn simple_map)- the name of a getter function that will return values from the map.: map hasher(blake2_128_concat)- beginning of the type declaration. This is a map and it will use theblake2_128_concathasher. More on this below.T::AccountId => u32- The specific key and value type of the map. This is a map fromAccountIds tou32s.
Choosing a Hasher
Although the syntax above is complex, most of it should be straightforward if you've understood the
recipe on storage values. The last unfamiliar piece of writing a storage map is choosing which
hasher to use. In general you should choose one of the three following hashers. The choice of hasher
will affect the performance and security of your chain. If you don't want to think much about this,
just choose blake2_128_concat and skip to the next section.
blake2_128_concat
This is a cryptographically secure hash function, and is always safe to use. It is reasonably
efficient, and will keep your storage tree balanced. You must choose this hasher if users of your
chain have the ability to affect the storage keys. In this pallet, the keys are AccountIds. At
first it may seem that the user doesn't affect the AccountId, but in reality a malicious user
can generate thousands of accounts and use the one that will affect the chain's storage tree in the
way the attacker likes. For this reason, we have chosen to use the blake2_128_concat hasher.
twox_64_concat
This hasher is not cryptographically secure, but is more efficient than blake2. Thus it represents trading security for performance. You should not use this hasher if chain users can affect the storage keys. However, it is perfectly safe to use this hasher to gain performance in scenarios where the users do not control the keys. For example, if the keys in your map are sequentially increasing indices and users cannot cause the indices to rapidly increase, then this is a perfectly reasonable choice.
identity
The identity "hasher" is really not a hasher at all, but merely an
identity function that returns the same value it
receives. This hasher is only an option when the key type in your storage map is already a hash,
and is not controllable by the user. If you're in doubt whether the user can influence the key just
use blake2.
The Storage Map API
This pallet demonstrated some of the most common methods available in a storage map including
insert, get, take, and contains_key.
// Insert
<SimpleMap<T>>::insert(&user, entry);

// Get
let entry = <SimpleMap<T>>::get(account);

// Take
let entry = <SimpleMap<T>>::take(&user);

// Contains Key
<SimpleMap<T>>::contains_key(&user)
The rest of the API is documented in the rustdocs on the
StorageMap trait. You do
not need to explicitly use this trait because the decl_storage! macro will do it for you if you
use a storage map.
Cache Multiple Calls
pallets/storage-cache
Calls to runtime storage have an associated cost and developers should strive to minimize the number of calls.
#[pallet::storage]
#[pallet::getter(fn some_copy_value)]
pub(super) type SomeCopyValue<T: Config> = StorageValue<_, u32, ValueQuery>;

#[pallet::storage]
#[pallet::getter(fn king_member)]
pub(super) type KingMember<T: Config> = StorageValue<_, T::AccountId, ValueQuery>;

#[pallet::storage]
#[pallet::getter(fn group_members)]
pub(super) type GroupMembers<T: Config> = StorageValue<_, Vec<T::AccountId>, ValueQuery>;
Copy Types
For Copy types, it is easy to reuse
previous storage calls by simply reusing the value, which is automatically cloned upon reuse. In the
code below, the second call is unnecessary:
#[pallet::call]
impl<T: Config> Pallet<T> {
	///  (Copy) inefficient way of updating value in storage
	///
	/// storage value -> storage_value * 2 + input_val
	#[pallet::weight(10_000)]
	pub fn increase_value_no_cache(
		origin: OriginFor<T>,
		some_val: u32,
	) -> DispatchResultWithPostInfo {
		let _ = ensure_signed(origin)?;
		let original_call = <SomeCopyValue<T>>::get();
		let some_calculation = original_call
			.checked_add(some_val)
			.ok_or("addition overflowed1")?;
		// this next storage call is unnecessary and is wasteful
		let unnecessary_call = <SomeCopyValue<T>>::get();
		// should've just used `original_call` here because u32 is copy
		let another_calculation = some_calculation
			.checked_add(unnecessary_call)
			.ok_or("addition overflowed2")?;
		<SomeCopyValue<T>>::put(another_calculation);
		let now = <frame_system::Module<T>>::block_number();
		Self::deposit_event(Event::InefficientValueChange(another_calculation, now));
		Ok(().into())
}
Instead, the initial call value should be reused. In this example, the SomeCopyValue value is
Copy so we should prefer the following
code without the unnecessary second call to storage:
#[pallet::weight(10_000)]
pub fn increase_value_w_copy(
	origin: OriginFor<T>,
	some_val: u32,
	) -> DispatchResultWithPostInfo {
		let _ = ensure_signed(origin)?;
		let original_call = <SomeCopyValue<T>>::get();
		let some_calculation = original_call
			.checked_add(some_val)
			.ok_or("addition overflowed1")?;
		// uses the original_call because u32 is copy
		let another_calculation = some_calculation
			.checked_add(original_call)
			.ok_or("addition overflowed2")?;
		<SomeCopyValue<T>>::put(another_calculation);
		let now = <frame_system::Module<T>>::block_number();
		Self::deposit_event(Event::BetterValueChange(another_calculation, now));
		Ok(().into())
}
Clone Types
If the type was not Copy, but was Clone,
then it is still better to clone the value in the method than to make another call to runtime
storage.
The runtime methods enable the calling account to swap the T::AccountId value in storage if
- the existing storage value is not in
GroupMembersAND - the calling account is in
GroupMembers
The first implementation makes a second unnecessary call to runtime storage instead of cloning the
call for existing_key:
#[pallet::weight(10_000)]
pub fn swap_king_no_cache(origin: OriginFor<T>) -> DispatchResultWithPostInfo {
	let new_king = ensure_signed(origin)?;
	let existing_king = <KingMember<T>>::get();

	// only places a new account if
	// (1) the existing account is not a member &&
	// (2) the new account is a member
	ensure!(
		!Self::is_member(&existing_king),
		"current king is a member so maintains priority"
	);
	ensure!(
		Self::is_member(&new_king),
		"new king is not a member so doesn't get priority"
	);

	// BAD (unnecessary) storage call
	let old_king = <KingMember<T>>::get();
	// place new king
	<KingMember<T>>::put(new_king.clone());

	Self::deposit_event(Event::InefficientKingSwap(old_king, new_king));
	Ok(().into())
}
If the existing_key is used without a clone in the event emission instead of old_king, then
the compiler returns the following error:
error[E0382]: use of moved value: `existing_king`
  --> src/lib.rs:93:63
   |
80 |             let existing_king = <KingMember<T>>::get();
   |                 ------------- move occurs because `existing_king` has type `<T as frame_system::Config>::AccountId`, which does not implement the `Copy` trait
...
85 |             ensure!(!Self::is_member(existing_king), "is a member so maintains priority");
   |                                      ------------- value moved here
...
93 |             Self::deposit_event(RawEvent::InefficientKingSwap(existing_king, new_king));
   |                                                               ^^^^^^^^^^^^^ value used here after move

error: aborting due to previous error

For more information about this error, try `rustc --explain E0382`.
error: Could not compile `storage-cache`.

To learn more, run the command again with --verbose.
Fixing this only requires cloning the original value before it is moved:
#[pallet::weight(10_000)]
pub fn swap_king_with_cache(origin: OriginFor<T>) -> DispatchResultWithPostInfo {
	let new_king = ensure_signed(origin)?;
	let existing_king = <KingMember<T>>::get();
	// prefer to clone previous call rather than repeat call unnecessarily
	let old_king = existing_king.clone();

	// only places a new account if
	// (1) the existing account is not a member &&
	// (2) the new account is a member
	ensure!(
		!Self::is_member(&existing_king),
		"current king is a member so maintains priority"
	);
	ensure!(
		Self::is_member(&new_king),
		"new king is not a member so doesn't get priority"
	);

	// <no (unnecessary) storage call here>
	// place new king
	<KingMember<T>>::put(new_king.clone());

	Self::deposit_event(Event::BetterKingSwap(old_king, new_king));
	Ok(().into())
}
Not all types implement Copy or
Clone, so it is important to discern other
patterns that minimize and alleviate the cost of calls to storage.
Using Vectors as Sets
pallets/vec-set
A Set is an unordered data structure that stores entries without duplicates. Substrate's storage API does not provide a way to declare sets explicitly, but they can be implemented using either vectors or maps.
This recipe demonstrates how to implement a storage set on top of a vector, and explores the
performance of the implementation. When implementing a set in your own runtime, you should compare
this technique to implementing a map-set.
In this pallet we implement a set of AccountIds. We do not use the set for anything in this
pallet; we simply maintain the set. Using the set is demonstrated in the recipe on
pallet coupling. We provide dispatchable calls to add and remove members,
ensuring that the number of members never exceeds a hard-coded maximum.
/// A maximum number of members. When membership reaches this number, no new members may join.
pub const MAX_MEMBERS: usize = 16;
Storage Item
We will store the members of our set in a Rust
Vec. A Vec is a collection of elements that
is ordered and may contain duplicates. Because the Vec provides more functionality than our set
needs, we are able to build a set from the Vec. We declare our single storage item as so
#[pallet::storage]
#[pallet::getter(fn members)]
pub(super) type Members<T: Config> = StorageValue<_, Vec<T::AccountId>, ValueQuery>;
In order to use the Vec successfully as a set, we will need to manually ensure that no duplicate
entries are added. To ensure reasonable performance, we will enforce that the Vec always remains
sorted. This allows for quickly determining whether an item is present using a
binary search.
Adding Members
Any user may join the membership set by calling the add_member dispatchable, providing they are
not already a member and the membership limit has not been reached. We check for these two
conditions first, and then insert the new member only after we are sure it is safe to do so. This is
an example of the mnemonic idiom, "verify first write last".
#[pallet::weight(10_000)]
pub fn add_member(origin: OriginFor<T>) -> DispatchResultWithPostInfo {
	let new_member = ensure_signed(origin)?;

	let mut members = Members::<T>::get();
	ensure!(
		members.len() < MAX_MEMBERS,
		Error::<T>::MembershipLimitReached
		);

		// We don't want to add duplicate members, so we check whether the potential new
		// member is already present in the list. Because the list is always ordered, we can
		// leverage the binary search which makes this check O(log n).
		match members.binary_search(&new_member) {
			// If the search succeeds, the caller is already a member, so just return
			Ok(_) => Err(Error::<T>::AlreadyMember.into()),
			// If the search fails, the caller is not a member and we learned the index where
			// they should be inserted
			Err(index) => {
				members.insert(index, new_member.clone());
				Members::<T>::put(members);
				Self::deposit_event(Event::MemberAdded(new_member));
				Ok(().into())
		}
	}
}
If it turns out that the caller is not already a member, the binary search will fail. In this case
it still returns the index into the Vec at which the member would have been stored had they been
present. We then use this information to insert the member at the appropriate location, thus
maintaining a sorted Vec.
Removing a Member
Removing a member is straightforward. We begin by looking for the caller in the list. If not present, there is no work to be done. If the caller is present, the search algorithm returns her index, and she can be removed.
#[pallet::weight(10_000)]
pub fn remove_member(origin: OriginFor<T>) -> DispatchResultWithPostInfo {
	let old_member = ensure_signed(origin)?;

	let mut members = Members::<T>::get();

	// We have to find out if the member exists in the sorted vec, and, if so, where.
	match members.binary_search(&old_member) {
		// If the search succeeds, the caller is a member, so remove her
		Ok(index) => {
			members.remove(index);
			Members::<T>::put(members);
			Self::deposit_event(Event::MemberRemoved(old_member));
			Ok(().into())
		}
		// If the search fails, the caller is not a member, so just return
		Err(_) => Err(Error::<T>::NotMember.into()),
	}
}
Performance
Now that we have built our set, let's analyze its performance in some common operations.
Membership Check
In order to check for the presence of an item in a vec-set, we make a single storage read, decode
the entire vector, and perform a binary search.
DB Reads: O(1) Decoding: O(n) Search: O(log n)
Updating
Updates to the set, such as adding and removing members as we demonstrated, requires first
performing a membership check. It also requires re-encoding the entire Vec and storing it back in
the database. Finally, it still costs the normal
amortized constant time associated with mutating a
Vec.
DB Writes: O(1) Encoding: O(n)
Iteration
Iterating over all items in a vec-set is achieved by using the Vec's own
iter method. The entire set can
be read from storage in one go, and each item must be decoded. Finally, the actual processing you do
on the items will take some time.
DB Reads: O(1) Decoding: O(n) Processing: O(n)
Because accessing the database is a relatively slow operation, reading the entire list in a single
read is a big win. If you need to iterate over the data frequently, you may want a vec-set.
A Note on Weights
It is always important that the weight associated with your dispatchables represent the actual time it takes to execute them. In this pallet, we have provided an upper bound on the size of the set, which places an upper bound on the computation - this means we can use constant weight annotations. Your set operations should either have a maximum size or a custom weight function that captures the computation appropriately.
Using Maps as Sets
pallets/map-set
A Set is an unordered data structure that stores entries without duplicates. Substrate's storage API does not provide a way to declare sets explicitly, but they can be implemented using either vectors or maps.
This recipe shows how to implement a storage set on top of a map, and explores the performance of
the implementation. When implementing a set in your own runtime, you should compare this technique
to implementing a vec-set.
In this pallet we implement a set of AccountIds. We do not use the set for anything in this
pallet; we simply maintain its membership. Using the set is demonstrated in the recipe on
pallet coupling. We provide dispatchable calls to add and remove members,
ensuring that the number of members never exceeds a hard-coded maximum.
/// A maximum number of members. When membership reaches this number, no new members may join.
pub const MAX_MEMBERS: u32 = 16;
Storage Item
We will store the members of our set as the keys in one of Substrate's
StorageMaps. There is also
a recipe specifically about using storage maps. The storage map itself does not
track its size internally, so we introduce a second storage value for this purpose.
#[pallet::storage]
#[pallet::getter(fn members)]
pub(super) type Members<T: Config> =
StorageMap<_, Blake2_128Concat, T::AccountId, (), ValueQuery>;

#[pallet::storage]
pub(super) type MemberCount<T> = StorageValue<_, u32, ValueQuery>;
The value stored in the map is () because we only care about the keys.
Adding Members
Any user may join the membership set by calling the add_member dispatchable, so long as they are
not already a member and the membership limit has not been reached. We check for these two
conditions first, and then insert the new member only after we are sure it is safe to do so.
#[pallet::weight(10_000)]
pub fn add_member(origin: OriginFor<T>) -> DispatchResultWithPostInfo {
	let new_member = ensure_signed(origin)?;

	let member_count = MemberCount::<T>::get();
	ensure!(
		member_count < MAX_MEMBERS,
		Error::<T>::MembershipLimitReached
	);
When we successfully add a new member, we also manually update the size of the set.
Removing a Member
Removing a member is straightforward. We begin by looking for the caller in the list. If not present, there is no work to be done. If the caller is present, we simply remove them and update the size of the set.
#[pallet::weight(10_000)]
pub fn remove_member(origin: OriginFor<T>) -> DispatchResultWithPostInfo {
	let old_member = ensure_signed(origin)?;

	ensure!(
		Members::<T>::contains_key(&old_member),
		Error::<T>::NotMember
	);
Performance
Now that we have built our set, let's analyze its performance in some common operations.
Membership Check
In order to check for the presence of an item in a map set, we make a single storage read. If we only care about the presence or absence of the item, we don't even need to decode it. This constant time membership check is the greatest strength of a map set.
DB Reads: O(1)
Updating
Updates to the set, such as adding and removing members as we demonstrated, requires first performing a membership check. Additions also require encooding the new item.
DB Reads: O(1) Encoding: O(1) DB Writes: O(1)
If your set operations will require a lot of membership checks or mutation of individual items, you
may want a map-set.
Iteration
Iterating over all items in a map-set is achieved by using the
IterableStorageMap trait,
which iterates (key, value) pairs (although in this case, we don't care about the values). Because
each map entry is stored as an individual trie node, iterating a map set requires a database read
for each item. Finally, the actual processing of the items will take some time.
DB Reads: O(n) Decoding: O(n) Processing: O(n)
Because accessing the database is a relatively slow operation, returning to the database for each
item is quite expensive. If your set operations will require frequent iterating, you will probably
prefer a vec-set.
A Note on Weights
It is always important that the weight associated with your dispatchables represent the actual time it takes to execute them. In this pallet, we have provided an upper bound on the size of the set, which places an upper bound on the computation - this means we can use constant weight annotations. Your set operations should either have a maximum size or a custom weight function that captures the computation appropriately.
Efficent Subgroup Removal by Subkey: Double Maps
pallets/double-map
For some runtimes, it may be necessary to remove a subset of values in a key-value mapping. If the
subset maintain an associated identifier type, this can be done in a clean way with the
double_map via the
remove_prefix api.
pub type GroupIndex = u32; // this is Encode (which is necessary for double_map)

#[pallet::storage]
#[pallet::getter(fn member_score)]
pub(super) type MemberScore<T: Config> = StorageDoubleMap<
	_,
	Blake2_128Concat,
	GroupIndex,
	Blake2_128Concat,
	T::AccountId,
	u32,
	ValueQuery,
>;

#[pallet::storage]
#[pallet::getter(fn group_membership)]
pub(super) type GroupMembership<T: Config> =
		StorageMap<_, Blake2_128Concat, T::AccountId, GroupIndex, ValueQuery>;

#[pallet::storage]
#[pallet::getter(fn all_members)]
pub(super) type AllMembers<T: Config> = StorageValue<_, Vec<T::AccountId>, ValueQuery>;
For the purposes of this example, store the scores of each member in a map that associates this
u32 value with two keys: (1) a GroupIndex identifier, and (2) the member's AccountId. This
allows for efficient removal of all values associated with a specific GroupIndex identifier.
#[pallet::weight(10_000)]
pub fn remove_group_score(
	origin: OriginFor<T>,
	group: GroupIndex,
	) -> DispatchResultWithPostInfo {
		let member = ensure_signed(origin)?;

		let group_id = <GroupMembership<T>>::get(member);
		// check that the member is in the group
		ensure!(
			group_id == group,
			"member isn't in the group, can't remove it"
		);

		// remove all group members from MemberScore at once
		<MemberScore<T>>::remove_prefix(&group_id);

		Self::deposit_event(Event::RemoveGroup(group_id));
		Ok(().into())
}
Using and Storing Structs
pallets/struct-storage
In Rust, a struct, or structure, is a custom data type that lets you name and package together
multiple related values that make up a meaningful group. If you’re familiar with an object-oriented
language, a struct is like an object’s data attributes (read more in
The Rust Book).
Defining a Struct
To define a simple custom struct for the runtime, the following syntax may be used:
#[derive(Encode, Decode, Default, Clone, PartialEq)]
pub struct MyStruct {
    some_number: u32,
    optional_number: Option<u32>,
}
In the code snippet above, the
derive macro is declared to ensure
MyStruct conforms to shared behavior according to the specified
traits:
Encode, Decode, Default, Clone, PartialEq. If you wish the store this struct in blockchain
storage, you will need to derive (or manually ipmlement) each of these traits.
To use the Encode and Decode traits, it is necessary to import them.
use frame_support::codec::{Encode, Decode};
Structs with Generic Fields
The simple struct shown earlier only uses Rust primitive types for its fields. In the common case where you want to store types that come from your pallet's configuration trait (or the configuration trait of another pallet in your runtime), you must use generic type parameters in your struct's definition.
#[derive(Encode, Decode, Clone, Default, RuntimeDebug)]
pub struct InnerThing<Hash, Balance> {
	number: u32,
	hash: Hash,
	balance: Balance,
}
Here you can see that we want to store items of type Hash and Balance in the struct. Because
these types come from the system and balances pallets' configuration traits, we must specify them as
generics when declaring the struct.
It is often convenient to make a type alias that takes T, your pallet's configuration trait, as a
single type parameter. Doing so simply saves you typing in the future.
type InnerThingOf<T> = InnerThing<<T as frame_system::Config>::Hash, <T as pallet_balances::Config>::Balance>;
Structs in Storage
Using one of our structs as a storage item is not significantly different than using a primitive
type. When using a generic struct, we must supply all of the generic type parameters. This snippet
shows how to supply thos parameters when you have a type alias (like we do for InnerThing) as well
as when you don't. Whether to include the type alias is a matter of style and taste, but it is
generally preferred when the entire type exceeds the preferred line length.
#[pallet::storage]
#[pallet::getter(fn inner_things_by_numbers)]
pub(super) type InnerThingsByNumbers<T> =
		StorageMap<_, Blake2_128Concat, u32, InnerThingOf<T>, ValueQuery>;

#[pallet::storage]
#[pallet::getter(fn super_things_by_super_numbers)]
pub(super) type SuperThingsBySuperNumbers<T: Config> =
		StorageMap<_, Blake2_128Concat, u32, SuperThing<T::Hash, T::Balance>, ValueQuery>;
Interacting with the storage maps is now exactly as it was when we didn't use any custom structs
#[pallet::weight(10_000)]
pub fn insert_inner_thing(
	origin: OriginFor<T>,
	number: u32,
	hash: T::Hash,
	balance: T::Balance,
	) -> DispatchResultWithPostInfo {
		let _ = ensure_signed(origin)?;
		let thing = InnerThing {
			number,
			hash,
			balance,
		};
		<InnerThingsByNumbers<T>>::insert(number, thing);
		Self::deposit_event(Event::NewInnerThing(number, hash, balance));
		Ok(().into())
}
Nested Structs
Structs can also contain other structs as their fields. We have demonstrated this with the type
SuperThing. As you see, any generic types needed by the inner struct must also be supplied to the
outer.
#[derive(Encode, Decode, Default, RuntimeDebug)]
pub struct SuperThing<Hash, Balance> {
	super_number: u32,
	inner_thing: InnerThing<Hash, Balance>,
}
Ringbuffer Queue
pallets/ringbuffer-queue
Building a transient adapter on top of storage.
This pallet provides a trait and implementation for a ringbuffer that abstracts over storage items and presents them as a FIFO queue.
When building more sophisticated pallets you might notice a need for more complex data structures
stored in storage. This recipe shows how to build a transient storage adapter by walking through the
implementation of a ringbuffer FIFO queue. The adapter in this recipe manages a queue that is
persisted as a StorageMap and a (start, end) range in storage.
The
ringbuffer-queue/src/lib.rs
file contains the usage of the transient storage adapter while
ringbuffer-queue/src/ringbuffer.rs
contains the implementation.
Defining the RingBuffer Trait
First we define the queue interface we want to use:
pub trait RingBufferTrait<Item>
where
	Item: Codec + EncodeLike,
{
	/// Store all changes made in the underlying storage.
	fn commit(&self);
	/// Push an item onto the end of the queue.
	fn push(&mut self, i: Item);
	/// Pop an item from the start of the queue.
	fn pop(&mut self) -> Option<Item>;
	/// Return whether the queue is empty.
	fn is_empty(&self) -> bool;
}
It defines the usual push, pop and is_empty functions we expect from a queue as well as a
commit function that will be used to sync the changes made to the underlying storage.
Specifying the RingBuffer Transient
Now we want to add an implementation of the trait. We will be storing the start and end of the ringbuffer separately from the actual items and will thus need to store these in our struct:
pub struct RingBufferTransient<Index>
where
	Index: Codec + EncodeLike + Eq + Copy,
{
	start: Index,
	end: Index,
}
Defining the Storage Interface
In order to access the underlying storage we will also need to include the bounds (we will call the
type B) and the item storage (whose type will be M). In order to specify the constraints on the
storage map (M) we will also need to specify the Item type. This results in the following struct
definition:
pub struct RingBufferTransient<Item, B, M, Index>
where
	Item: Codec + EncodeLike,
	B: StorageValue<(Index, Index), Query = (Index, Index)>,
	M: StorageMap<Index, Item, Query = Item>,
	Index: Codec + EncodeLike + Eq + Copy,
{
	start: Index,
	end: Index,
	_phantom: PhantomData<(Item, B, M)>,
}
The bounds B will be a StorageValue storing a tuple of indices (Index, Index). The item
storage will be a StorageMap mapping from our Index type to the Item type. We specify the
associated Query type for both of them to help with type inference (because the value returned can
be different from the stored representation).
The Codec and
EncodeLike
type constraints make sure that both items and indices can be stored in storage.
We need the PhantomData in order
to "hold on to" the types during the lifetime of the transient object.
The Complete Type
There are two more alterations we will make to our struct to make it work well:
type DefaultIdx = u16;
pub struct RingBufferTransient<Item, B, M, Index = DefaultIdx>
where
	Item: Codec + EncodeLike,
	B: StorageValue<(Index, Index), Query = (Index, Index)>,
	M: StorageMap<Index, Item, Query = Item>,
	Index: Codec + EncodeLike + Eq + WrappingOps + From<u8> + Copy,
{
	start: Index,
	end: Index,
	_phantom: PhantomData<(Item, B, M)>,
}
We specify a default type for Index and define it as u16 to allow for 65536 entries in the
ringbuffer per default. We also add the WrappingOps and From<u8> type bounds to enable the kind
of operations we need in our implementation. More details in the implementation
section, especially in the WrappingOps subsection.
Implementation of the RingBuffer
Now that we have the type definition for RingBufferTransient we need to write the implementation.
Instantiating the Transient
First we need to specify how to create a new instance by providing a new function:
impl<Item, B, M, Index> RingBufferTransient<Item, B, M, Index>
where // ... same where clause as the type, elided here
{
	pub fn new() -> RingBufferTransient<Item, B, M, Index> {
		let (start, end) = B::get();
		RingBufferTransient {
			start, end, _phantom: PhantomData,
		}
	}
}
Here we access the bounds stored in storage to initialize the transient.
Aside: Of course we could also provide a
with_boundsfunction that takes the bounds as a parameter. Feel free to add that function as an exercise.
Second Aside: This
B::get()is one of the reasons for specifying theQueryassociated type on theStorageValuetype constraint.
Implementing the RingBufferTrait
We will now implement the RingBufferTrait:
impl<Item, B, M, Index> RingBufferTrait<Item> for RingBufferTransient<Item, B, M, Index>
where // same as the struct definition
	Item: Codec + EncodeLike,
	B: StorageValue<(Index, Index), Query = (Index, Index)>,
	M: StorageMap<Index, Item, Query = Item>,
	Index: Codec + EncodeLike + Eq + WrappingOps + From<u8> + Copy,
{
	fn commit(&self) {
		B::put((self.start, self.end));
	}
commit just consists of putting the potentially changed bounds into storage. You will notice that
we don't update the bounds' storage when changing them in the other functions.
	fn is_empty(&self) -> bool {
		self.start == self.end
	}
The is_empty function just checks whether the start and end bounds have the same value to
determine whether the queue is empty, thus avoiding expensive storage accesses. This means we need
to uphold the corresponding invariant in the other (notably the push) functions.
	fn push(&mut self, item: Item) {
		M::insert(self.end, item);
		// this will intentionally overflow and wrap around when bonds_end
		// reaches `Index::max_value` because we want a ringbuffer.
		let next_index = self.end.wrapping_add(1.into());
		if next_index == self.start {
			// queue presents as empty but is not
			// --> overwrite the oldest item in the FIFO ringbuffer
			self.start = self.start.wrapping_add(1.into());
		}
		self.end = next_index;
	}
In the push function, we insert the pushed item into the map and calculate the new bounds by
using the wrapping_add function. This way our ringbuffer will wrap around when reaching
max_value of the Index type. This is why we need the WrappingOps type trait for Index.
The if is necessary because we need to keep the invariant that start == end means that the queue
is empty, otherwise we would need to keep track of this state separately. We thus "toss away" the
oldest item in the queue if a new item is pushed into a full queue by incrementing the start index.
Note: The
WrappingOpsTraitThe ringbuffer should be agnostic to the concrete
Indextype used. In order to decrement and increment the start and end index, though, any concrete type needs to implementwrapping_addandwrapping_sub. Becausestddoes not provide such a trait, we need another way to require this behavior. We just implement our own traitWrappingOpsfor the types we want to support (u8,u16,u32andu64).
The last function we implement is pop:
	fn pop(&mut self) -> Option<Item> {
		if self.is_empty() {
			return None;
		}
		let item = M::take(self.start);
		self.start = self.start.wrapping_add(1.into());

		item.into()
	}
We can return None on is_empty because we are upholding the invariant. If the queue is not empty
we take the value at self.start from storage, i.e. the first value is removed from storage and
passed to us. We then increment self.start to point to the new first item of the queue, again
using the wrapping_add to get the ringbuffer behavior.
Implementing Drop
In order to make the usage more ergonomic and to avoid synchronization errors (where the storage map
diverges from the bounds) we also implement the
Drop trait:
impl<Item, B, M, Index> Drop for RingBufferTransient<Item, B, M, Index>
where // ... same where clause elided
{
	fn drop(&mut self) {
		<Self as RingBufferTrait<Item>>::commit(self);
	}
}
On drop, we commit the bounds to storage. With this implementation of Drop, commit is called
when our transient goes out of scope, making sure that the storage state is consistent for the next
call to the using pallet.
Typical Usage
The
lib.rs
file of the pallet shows typical usage of the transient.
impl<T: Config> Module<T> {
	fn queue_transient() -> Box<dyn RingBufferTrait<ValueStruct>> {
		Box::new(RingBufferTransient::<
			ValueStruct,
			<Self as Store>::BufferRange,
			<Self as Store>::BufferMap,
			BufferIndex,
		>::new())
	}
}
First we define a constructor function (queue_transient) so we don't have to specify the types
every time we want to access the transient. This function constructs a ringbuffer transient and
returns it as a boxed trait object. See the Rust book's section on
trait objects
for an explanation of why we need a boxed trait object (defined with the syntax dyn TraitName)
when using dynamic dispatch.
The add_multiple function shows the actual typical usage of our transient:
pub fn add_multiple(origin, integers: Vec<i32>, boolean: bool) -> DispatchResult {
	let _user = ensure_signed(origin)?;
	let mut queue = Self::queue_transient();
	for integer in integers {
		queue.push(ValueStruct{ integer, boolean });
	}
	Ok(())
} // commit happens on drop
Here we use the queue_transient function defined above to get a queue object. We then push
into it repeatedly with commit happening on drop of the queue object at the end of the
function. pop works analogously and can of course be intermixed with pushes.
Basic Token
pallets/basic-token
This recipe demonstrates a simple but functional token in a pallet.
Mapping Accounts to Balances
Mappings are a very powerful primitive. A stateful cryptocurrency might store a mapping between accounts and balances. Likewise, mappings prove useful when representing owned data. By tracking ownership with maps, it is easy manage permissions for modifying values specific to individual users or groups.
Storage Items
The primary storage item is the mapping between AccountIds and Balances described above. Every account that holds tokens appears as a key in that map and its value is the number of tokens it holds.
The next two storage items set the total supply of the token and keep track of whether the token has been initialized yet.
#[pallet::storage]
	#[pallet::getter(fn get_balance)]
	pub(super) type Balances<T: Config> =
		StorageMap<_, Blake2_128Concat, T::AccountId, u64, ValueQuery>;

#[pallet::type_value]
	pub(super) fn TotalSupplyDefaultValue<T: Config>() -> u64 {
		21000000
}

#[pallet::storage]
	#[pallet::getter(fn is_init)]
	pub(super) type Init<T: Config> = StorageValue<_, bool, ValueQuery>;
Because users can influence the keys in our storage map, we've chosen the blake2_128_concat hasher
as described in the recipe on storage mapss.
Events and Errors
The pallet defines events and errors for common lifecycle events such as successful and failed transfers, and successful and failed initialization.
#[pallet::event]
	#[pallet::metadata(T::AccountId = "AccountId")]
	#[pallet::generate_deposit(pub (super) fn deposit_event)]
	pub enum Event<T: Config> {
		/// Token was initialized by user
		Initialized(T::AccountId),
		/// Tokens successfully transferred between users
		Transfer(T::AccountId, T::AccountId, u64), // (from, to, value)
}

#[pallet::error]
	pub enum Error<T> {
		/// Attempted to initialize the token after it had already been initialized.
		AlreadyInitialized,
		/// Attempted to transfer more funds than were available
		InsufficientFunds,
}
Initializing the Token
In order for the token to be useful, some accounts need to own it. There are many possible ways to
initialize a token including genesis config, claims process, lockdrop, and many more. This pallet
will use a simple process where the first user to call the init function receives all of the
funds. The total supply is hard-coded in the pallet in a fairly naive way: It is specified as the
default value in the decl_storage! block.
#[pallet::weight(10_000)]
		pub fn init(_origin: OriginFor<T>) -> DispatchResultWithPostInfo {
			let sender = ensure_signed(_origin)?;
			ensure!(!Self::is_init(), <Error<T>>::AlreadyInitialized);

			<Balances<T>>::insert(sender, Self::total_supply());

			Init::<T>::put(true);
			Ok(().into())
}
As usual, we first check for preconditions. In this case that means making sure that the token is not already initialized. Then we do any mutation necessary.
Transferring Tokens
To transfer tokens, a user who owns some tokens calls the transfer method specifying the recipient
and the amount of tokens to transfer as parameters.
We again check for error conditions before mutating storage. In this case it is not necessary to
check whether the token has been initialized. If it has not, nobody has any funds and the transfer
will simply fail with InsufficientFunds.
#[pallet::weight(10_000)]
		pub fn transfer(
			_origin: OriginFor<T>,
			to: T::AccountId,
			value: u64,
		) -> DispatchResultWithPostInfo {
			let sender = ensure_signed(_origin)?;
			let sender_balance = Self::get_balance(&sender);
			let receiver_balance = Self::get_balance(&to);

			// Calculate new balances
			let updated_from_balance = sender_balance
				.checked_sub(value)
				.ok_or(<Error<T>>::InsufficientFunds)?;
			let updated_to_balance = receiver_balance
				.checked_add(value)
				.expect("Entire supply fits in u64; qed");

			// Write new balances to storage
			<Balances<T>>::insert(&sender, updated_from_balance);
			<Balances<T>>::insert(&to, updated_to_balance);

			Self::deposit_event(Event::Transfer(sender, to, value));
			Ok(().into())
}
Don't Panic!
When adding the incoming balance, notice the peculiar .expect method. In Substrate, your runtime must never panic. To encourage careful thinking about your code, you use the .expect
method and provide a proof of why the potential panic will never happen.
Configurable Pallet Constants
pallets/constant-config
To declare constant values within a runtime, it is necessary to import the
Get trait from frame_support
use frame_support::traits::Get;
Configurable constants are declared as associated types in the pallet's configuration trait using
the Get<T> syntax for any type T.
pub trait Config: frame_system::Config {
	type Event: From<Event> + Into<<Self as frame_system::Config>::Event>;

	/// Maximum amount added per invocation
	type MaxAddend: Get<u32>;

	/// Frequency with which the stored value is deleted
	type ClearFrequency: Get<Self::BlockNumber>;
}
In order to make these constants and their values appear in the runtime metadata, it is necessary to
declare them with the const syntax. Usually constants are declared at
the top of this block, right after fn deposit_event.
#[pallet::config]
pub trait Config: frame_system::Config {
	type Event: From<Event> + IsType<<Self as frame_system::Config>::Event>;

	/// Maximum amount added per invocation
	type MaxAddend: Get<u32>;

	/// Frequency with which the stored value is deleted
	type ClearFrequency: Get<Self::BlockNumber>;
}
This example manipulates a single value in storage declared as SingleValue.
#[pallet::storage]
#[pallet::getter(fn single_value)]
pub(super) type SingleValue<T: Config> = StorageValue<_, u32, ValueQuery>;
SingleValue is set to 0 every ClearFrequency number of blocks in the on_finalize function
that runs at the end of blocks execution.
#[pallet::hooks]
impl<T: Config> Hooks<T::BlockNumber> for Pallet<T> {
	fn on_finalize(n: T::BlockNumber) {
		if (n % T::ClearFrequency::get()).is_zero() {
			let c_val = SingleValue::<T>::get();
			SingleValue::<T>::put(0u32);
			Self::deposit_event(Event::Cleared(c_val));
		}
	}
}
Signed transactions may invoke the add_value runtime method to increase SingleValue as long as
each call adds less than MaxAddend. There is no anti-sybil mechanism so a user could just split a
larger request into multiple smaller requests to overcome the MaxAddend, but overflow is still
handled appropriately.
#[pallet::weight(10_000)]
pub fn add_value(origin: OriginFor<T>, val_to_add: u32) -> DispatchResultWithPostInfo {
	let _ = ensure_signed(origin)?;
	ensure!(
		val_to_add <= T::MaxAddend::get(),
		"value must be <= maximum add amount constant"
	);

	// previous value got
	let c_val = SingleValue::<T>::get();

	// checks for overflow when new value added
	let result = match c_val.checked_add(val_to_add) {
		Some(r) => r,
		None => {
			return Err(DispatchErrorWithPostInfo {
				post_info: PostDispatchInfo::from(()),
				error: DispatchError::Other("Addition overflowed"),
			})
		}
	};
	SingleValue::<T>::put(result);
	Self::deposit_event(Event::Added(c_val, val_to_add, result));
	Ok(().into())
}
In more complex patterns, the constant value may be used as a static, base value that is scaled by a multiplier to incorporate stateful context for calculating some dynamic fee (i.e. floating transaction fees).
Supplying the Constant Value
When the pallet is included in a runtime, the runtime developer supplies the value of the constant
using the
parameter_types! macro. This
pallet is included in the super-runtime where we see the following macro invocation and trait
implementation.
#![allow(unused)]
fn main() {
parameter_types! {
	pub const MaxAddend: u32 = 1738;
	pub const ClearFrequency: u32 = 10;
}

#[pallet::config]
pub trait Config: frame_system::Config {
	type Event: From<Event> + IsType<<Self as frame_system::Config>::Event>;

	/// Maximum amount added per invocation
	type MaxAddend: Get<u32>;

	/// Frequency with which the stored value is deleted
	type ClearFrequency: Get<Self::BlockNumber>;
}
}
Simple Crowdfund
pallets/simple-crowdfund
This pallet demonstrates a simple on-chain crowdfunding app where participants can pool funds toward a common goal. It demonstrates a pallet that controls multiple token accounts, and storing data in child storage.
Basic Usage
Any user can start a crowdfund by specifying a goal amount for the crowdfund, an end time, and a beneficiary who will receive the pooled funds if the goal is reached by the end time. If the fund is not successful, it enters into a retirement period when contributors can reclaim their pledged funds. Finally, an unsuccessful fund can be dissolved, sending any remaining tokens to the user who dissolves it.
Configuration Trait
We begin by declaring our configuration trait. In addition to the ubiquitous Event type, our
crowdfund pallet will depend on a notion of
Currency, and three
configuration constants.
#[pallet::config]
pub trait Config: frame_system::Config {
	/// The ubiquious Event type
	type Event: From<Event<Self>> + IsType<<Self as frame_system::Config>::Event>;

	/// The currency in which the crowdfunds will be denominated
	type Currency: ReservableCurrency<Self::AccountId>;

	/// The amount to be held on deposit by the owner of a crowdfund
	type SubmissionDeposit: Get<BalanceOf<Self>>;

	/// The minimum amount that may be contributed into a crowdfund. Should almost certainly be at
	/// least ExistentialDeposit.
	type MinContribution: Get<BalanceOf<Self>>;

	/// The period of time (in blocks) after an unsuccessful crowdfund ending during which
	/// contributors are able to withdraw their funds. After this period, their funds are lost.
	type RetirementPeriod: Get<Self::BlockNumber>;
}
Custom Types
Our pallet introduces a custom struct that is used to store the metadata about each fund.
#[derive(Encode, Decode, Default, PartialEq, Eq)]
#[cfg_attr(feature = "std", derive(Debug))]
pub struct FundInfo<AccountId, Balance, BlockNumber> {
	/// The account that will receive the funds if the campaign is successful
	pub beneficiary: AccountId,
	/// The amount of deposit placed
	pub deposit: Balance,
	/// The total amount raised
	pub raised: Balance,
	/// Block number after which funding must have succeeded
	pub end: BlockNumber,
	/// Upper bound on `raised`
	pub goal: Balance,
}
In addition to this FundInfo struct, we also introduce an index type to track the number of funds
that have ever been created and three convenience aliases.
pub type FundIndex = u32;

type AccountIdOf<T> = <T as frame_system::Config>::AccountId;
type BalanceOf<T> = <<T as Config>::Currency as Currency<AccountIdOf<T>>>::Balance;
type FundInfoOf<T> = FundInfo<AccountIdOf<T>, BalanceOf<T>, <T as frame_system::Config>::BlockNumber>;
Storage
The pallet has two storage items declared the usual way using decl_storage!. The first is the
index that tracks the number of funds, and the second is a mapping from index to FundInfo.
#[pallet::storage]
#[pallet::getter(fn funds)]
pub(super) type Funds<T: Config> = StorageMap<_, Blake2_128Concat, FundIndex, FundInfoOf<T>, OptionQuery>;

#[pallet::storage]
#[pallet::getter(fn fund_count)]
pub(super) type FundCount<T: Config> = StorageValue<_, FundIndex, ValueQuery>;
This pallet also stores the data about which users have contributed and how many funds they contributed in a child trie. This child trie is not explicitly declared anywhere.
The use of the child trie provides two advantages over using standard storage. First, it allows for removing the entirety of the trie is a single storage write when the fund is dispensed or dissolved. Second, it allows any contributor to prove that they contributed using a Merkle Proof.
Using the Child Trie API
The child API is abstracted into a few helper functions in the impl<T: Config> Module<T> block.
/// Record a contribution in the associated child trie.
pub fn contribution_put(index: FundIndex, who: &T::AccountId, balance: &BalanceOf<T>) {
	let id = Self::id_from_index(index);
	who.using_encoded(|b| child::put(&id, b, &balance));
}

/// Lookup a contribution in the associated child trie.
pub fn contribution_get(index: FundIndex, who: &T::AccountId) -> BalanceOf<T> {
	let id = Self::id_from_index(index);
	who.using_encoded(|b| child::get_or_default::<BalanceOf<T>>(&id, b))
}

/// Remove a contribution from an associated child trie.
pub fn contribution_kill(index: FundIndex, who: &T::AccountId) {
	let id = Self::id_from_index(index);
	who.using_encoded(|b| child::kill(&id, b));
}

/// Remove the entire record of contributions in the associated child trie in a single
/// storage write.
pub fn crowdfund_kill(index: FundIndex) {
	let id = Self::id_from_index(index);
	child::kill_storage(&id);
}
Because this pallet uses one trie for each active crowdfund, we need to generate a unique
ChildInfo for each of
them. To ensure that the ids are really unique, we incluce the FundIndex in the generation.
pub fn id_from_index(index: FundIndex) -> child::ChildInfo {
	let mut buf = Vec::new();
	buf.extend_from_slice(b"crowdfnd");
	buf.extend_from_slice(&index.to_le_bytes()[..]);

	child::ChildInfo::new_default(T::Hashing::hash(&buf[..]).as_ref())
}
Pallet Dispatchables
The dispatchable functions in this pallet follow a standard flow of verifying preconditions, raising appropriate errors, mutating storage, and finally emitting events. We will not present them all in this writeup, but as always, you're encouraged to experiment with the recipe.
We will look closely only at the dispense dispatchable which pays the funds to the beneficiary
after a successful crowdfund. This dispatchable, as well as dissolve, use an incentivization
scheme to encourage users of the chain to eliminate extra data as soon as possible.
Data from finished funds takes up space on chain, so it is best to settle the fund and cleanup the
data as soon as possible. To incentivize this behavior, the pallet awards the initial deposit to
whoever calls the dispense function. Users, in hopes of receiving this reward, will race to call
these cleanup methods before each other.
/// Dispense a payment to the beneficiary of a successful crowdfund.
/// The beneficiary receives the contributed funds and the caller receives
/// the deposit as a reward to incentivize clearing settled crowdfunds out of storage.
#[pallet::weight(10_000)]
pub fn dispense(origin: OriginFor<T>, index: FundIndex) -> DispatchResultWithPostInfo {
	let caller = ensure_signed(origin)?;

	let fund = Self::funds(index).ok_or(Error::<T>::InvalidIndex)?;

	// Check that enough time has passed to remove from storage
	let now = <frame_system::Module<T>>::block_number();

	ensure!(now >= fund.end, Error::<T>::FundStillActive);

	// Check that the fund was actually successful
	ensure!(fund.raised >= fund.goal, Error::<T>::UnsuccessfulFund);

	let account = Self::fund_account_id(index);

	// Beneficiary collects the contributed funds
	let _ = T::Currency::resolve_creating(
		&fund.beneficiary,
		T::Currency::withdraw(
			&account,
			fund.raised,
			WithdrawReasons::TRANSFER,
			ExistenceRequirement::AllowDeath,
		)?,
	);

	// Caller collects the deposit
	let _ = T::Currency::resolve_creating(
		&caller,
		T::Currency::withdraw(
			&account,
			fund.deposit,
			WithdrawReasons::TRANSFER,
			ExistenceRequirement::AllowDeath,
		)?,
	);

	// Remove the fund info from storage
	<Funds<T>>::remove(index);
	// Remove all the contributor info from storage in a single write.
	// This is possible thanks to the use of a child tree.
	Self::crowdfund_kill(index);

	Self::deposit_event(Event::Dispensed(index, now, caller));
	Ok(().into())
}
This pallet also uses the Currency
Imbalance trait as discussed in
the Charity recipe, to make transfers without incurring transfer fees to the
crowdfund pallet itself.
Instantiable Pallets
pallets/last-caller
pallets/default-instance
Instantiable pallets enable multiple instances of the same pallet logic within a single runtime. Each instance of the pallet has its own independent storage, and extrinsics must specify which instance of the pallet they are intended for. These patterns are illustrated in the kitchen in the last-caller and default-instance pallets.
Some use cases:
- Token chain hosts two independent cryptocurrencies.
- Marketplace track users' reputations as buyers separately from their reputations as sellers.
- Governance has two (or more) houses which act similarly internally.
Substrate's own Balances and Collective pallets are good examples of real-world code using this technique. The default Substrate node has two instances of the Collectives pallet that make up its Council and Technical Committee. Each collective has its own storage, events, and configuration.
Council: collective::<Instance1>::{Module, Call, Storage, Origin<T>, Event<T>, Config<T>},
TechnicalCommittee: collective::<Instance2>::{Module, Call, Storage, Origin<T>, Event<T>, Config<T>}
Writing an Instantiable Pallet
Writing an instantiable pallet is almost entirely the same process as writing a plain non-instantiable pallet. There are just a few places where the syntax differs.
You must call
decl_storage!Instantiable pallets must call the
decl_storage!macro so that theInstancetype is created.
Configuration Trait
pub trait Config<I: Instance>: frame_system::Config {
	/// The overarching event type.
	type Event: From<Event<Self, I>> + Into<<Self as frame_system::Config>::Event>;
}
Storage Declaration
decl_storage! {
	trait Store for Module<T: Config<I>, I: Instance> as TemplatePallet {
		...
	}
}
Declaring the Module Struct
decl_module! {
	/// The module declaration.
	pub struct Module<T: Config<I>, I: Instance> for enum Call where origin: T::Origin {
		...
	}
}
Accessing Storage
<Something<T, I>>::put(something);
If the storage item does not use any types specified in the configuration trait, the T is omitted, as always.
<Something<I>>::put(something);
Event initialization
fn deposit_event() = default;
Event Declaration
decl_event!(
	pub enum Event<T, I> where AccountId = <T as frame_system::Config>::AccountId {
		...
	}
}
Installing a Pallet Instance in a Runtime
The syntax for including an instance of an instantiable pallet in a runtime is slightly different than for a regular pallet. The only exception is for pallets that use the Default Instance feature described below.
Implementing Configuration Traits
Each instance needs to be configured separately. Configuration consists of implementing the specific
instance's trait. The following snippet shows a configuration for Instance1.
impl template::Config<template::Instance1> for Runtime {
	type Event = Event;
}
Using the construct_runtime! Macro
The final step of installing the pallet instance in your runtime is updating the
construct_runtime! macro. You may give each instance a meaningful name. Here I've called
Instance1 FirstTemplate.
FirstTemplate: template::<Instance1>::{Module, Call, Storage, Event<T>, Config},
Default Instance
One drawback of instantiable pallets, as we've presented them so far, is that they require the runtime designer to use the more elaborate syntax even if they only desire a single instance of the pallet. To alleviate this inconvenience, Substrate provides a feature known as DefaultInstance. This allows runtime developers to deploy an instantiable pallet exactly as they would if it were not instantiable provided they only use a single instance.
To make your instantiable pallet support DefaultInstance, you must specify it in four places.
pub trait Config<I=DefaultInstance>: frame_system::Config {
decl_storage! {
	trait Store for Module<T: Config<I>, I: Instance=DefaultInstance> as TemplateModule {
		...
	}
}
decl_module! {
	pub struct Module<T: Config<I>, I: Instance = DefaultInstance> for enum Call where origin: T::Origin {
		...
	}
}
decl_event!(
	pub enum Event<T, I=DefaultInstance> where ... {
		...
	}
}
Having made these changes, a developer who uses your pallet doesn't need to know or care that your pallet is instantable. They can deploy it just as they would any other pallet.
Genesis Configuration
Some pallets require a genesis configuration to be specified. Let's look to the default Substrate node's use of the Collective pallet as an example.
In its chain_spec.rs file we see
GenesisConfig {
	...
	collective_Instance1: Some(CouncilConfig {
		members: vec![],
		phantom: Default::default(),
	}),
	collective_Instance2: Some(TechnicalCommitteeConfig {
		members: vec![],
		phantom: Default::default(),
	}),
	...
}
Computational Resources and Weights
pallets/weights
Any computational resources used by a transaction must be accounted for so that appropriate fees can be applied, and it is a pallet author's job to ensure that this accounting happens. Substrate provides a mechanism known as transaction weighting to quantify the resources consumed while executing a transaction.
Indeed, mispriced EVM operations have shown how operations that underestimate cost can provide economic DOS attack vectors: Onwards; Underpriced EVM Operations
Assigning Transaction Weights
Pallet authors can annotate their dispatchable function with a weight using syntax like this,
#[weight = <Some Weighting Instance>]
fn some_call(...) -> Result {
	// --snip--
}
For simple transactions a fixed weight will do. Substrate allows simply specifying a constant integer in cases situations like this.
decl_module! {
	pub struct Module<T: Config> for enum Call {

		#[weight = 10_000]
		fn store_value(_origin, entry: u32) -> DispatchResult {
			StoredValue::put(entry);
			Ok(())
		}
For more complex transactions, custom weight calculations can be performed that consider the
parameters passed to the call. This snippet shows a weighting struct that weighs transactions where
the first parameter is a bool. If the first parameter is true, then the weight is linear in the
second parameter. Otherwise the weight is constant. A transaction where this weighting scheme makes
sense is demonstrated in the kitchen.
pub struct Conditional(u32);

impl WeighData<(&bool, &u32)> for Conditional {
	fn weigh_data(&self, (switch, val): (&bool, &u32)) -> Weight {

		if *switch {
			val.saturating_mul(self.0)
		}
		else {
			self.0
		}
	}
}
In addition to the
WeightData Trait, shown
above, types that are used to calculate transaction weights must also implement
ClassifyDispatch,
and PaysFee.
impl<T> ClassifyDispatch<T> for Conditional {
    fn classify_dispatch(&self, _: T) -> DispatchClass {
        // Classify all calls as Normal (which is the default)
        Default::default()
    }
}
impl PaysFee for Conditional {
    fn pays_fee(&self) -> bool {
        true
    }
}
The complete code for this example as well as several others can be found in the kitchen.
Cautions
While you can make reasonable estimates of resource consumption at design time, it is always best to actually measure the resources required of your functions through an empirical process. Failure to perform such rigorous measurement may result in an economically insecure chain.
While it isn't enforced, calculating a transaction's weight should itself be a cheap operation. If the weight calculation itself is expensive, your chain will be insecure.
What About Fees?
Weights are used only to describe the computational resources consumed by a transaction, and enable accounting of these resources. To learn how to turn these weights into actual fees charged to transactors, continue to the recipe on Fees.
Charity
pallets/charity
The Charity pallet represents a simple charitable organization that collects funds into a pot that it controls, and allocates those funds to the appropriate causes. It demonstrates two useful concepts in Substrate development:
- A pallet-controlled shared pot of funds
- Absorbing imbalances from the runtime
Instantiate a Pot
Our charity needs an account to hold its funds. Unlike other accounts, it will not be controlled by
a user's cryptographic key pair, but directly by the pallet. To instantiate such a pool of funds,
import ModuleId and
AccountIdConversion
from sp-runtime.
use sp-runtime::{ModuleId, traits::AccountIdConversion};
With these imports, a PALLET_ID constant can be generated as an identifier for the pool of funds.
The PALLET_ID must be exactly eight characters long which is why we've included the exclamation
point. (Well, that and Charity work is just so exciting!) This identifier can be converted into an
AccountId with the into_account() method provided by the AccountIdConversion trait.
const PALLET_ID: ModuleId = ModuleId(*b"Charity!");

impl<T: Config> Module<T> {
	/// The account ID that holds the Charity's funds
	pub fn account_id() -> T::AccountId {
		PALLET_ID.into_account()
	}

	/// The Charity's balance
	fn pot() -> BalanceOf<T> {
		T::Currency::free_balance(&Self::account_id())
	}
}
Receiving Funds
Our charity can receive funds in two different ways.
Donations
The first and perhaps more familiar way is through charitable donations. Donations can be made
through a standard donate extrinsic which accepts the amount to be donated as a parameter.
#[pallet::call]
impl<T: Config> Pallet<T> {
	/// Donate some funds to the charity
	#[pallet::weight(10_000)]
	pub fn donate(origin: OriginFor<T>, amount: BalanceOf<T>) -> DispatchResultWithPostInfo {
		let donor = ensure_signed(origin)?;

		T::Currency::transfer(&donor, &Self::account_id(), amount, AllowDeath)
			.map_err(|_| DispatchError::Other("Can't make donation"))?;

			Self::deposit_event(Event::DonationReceived(donor, amount, Self::pot()));
			Ok(().into())
}
Imbalances
The second way the charity can receive funds is by absorbing imbalances created elsewhere in the
runtime. An Imbalance is
created whenever tokens are burned, or minted. Because our charity wants to collect funds, we are
specifically interested in
NegativeImbalances.
Negative imbalances are created, for example, when a validator is slashed for violating consensus
rules, transaction fees are collected, or another pallet burns funds as part of an
incentive-alignment mechanism. To allow our pallet to absorb these imbalances, we implement the
OnUnbalanced trait.
use frame_support::traits::{OnUnbalanced, Imbalance};
type NegativeImbalanceOf<T> = <<T as Config>::Currency as Currency<<T as frame_system::Config>::AccountId>>::NegativeImbalance;

impl<T: Config> OnUnbalanced<NegativeImbalanceOf<T>> for Module<T> {
	fn on_nonzero_unbalanced(amount: NegativeImbalanceOf<T>) {
		let numeric_amount = amount.peek();

		// Must resolve into existing but better to be safe.
		let _ = T::Currency::resolve_creating(&Self::account_id(), amount);

		Self::deposit_event(RawEvent::ImbalanceAbsorbed(numeric_amount, Self::pot()));
	}
}
Allocating Funds
In order for the charity to affect change with the funds it has collected it must be able to
allocate those funds. Our charity pallet abstracts the governance of where funds will be allocated
to the rest of the runtime. Funds can be allocated by a root call to the allocate extrinsic. One
good example of a governance mechanism for such decisions is Substrate's own
Democracy pallet.
Fixed Point Arithmetic
pallets/fixed-point
pallets/compounding-interest
When programmers learn to use non-integer numbers in their programs, they are usually taught to use floating points. In blockchain, we use an alternative representation of fractional numbers called fixed point. There are several ways to use fixed point numbers, and this recipe will introduce three of them. In particular we'll see:
- Substrate's own fixed point structs and traits
- The substrate-fixed library
- A manual fixed point implementation (and why it's nicer to use a library)
- A comparison of the two libraries in a compounding interest example
What's Wrong with Floats?
Floats are cool for all kinds of reasons, but they also have one important drawback. Floating point arithmetic is nondeterministic which means that different processors compute (slightly) different results for the same operation. Although there is an IEEE spec, nondeterminism can come from specific libraries used, or even hardware. In order for the nodes in a blockchain network to reach agreement on the state of the chain, all operations must be completely deterministic. Luckily fixed point arithmetic is deterministic, and is often not much harder to use once you get the hang of it.
Multiplicative Accumulators
The first pallet covered in this recipe contains three implementations of a multiplicative accumulator. That's a fancy way to say the pallet lets users submit fractional numbers and keeps track of the product from multiplying them all together. The value starts out at one (the multiplicative identity), and it gets multiplied by whatever values the users submit. These three independent implementations compare and contrast the features of each.
Permill Accumulator
We'll be using the most common approach which takes its fixed point implementation from Substrate
itself. There are a few fixed-point structs available in Substrate, all of which implement the
PerThing trait, that cover different
amounts of precision. For this accumulator example, we'll use the
PerMill struct which represents
fractions as parts per million. There are also
Perbill,
PerCent, and
PerU16, which all provide the same
interface (because it comes from the trait). Substrate's fixed-point structs are somewhat unique
because they represent only fractional parts of numbers. That means they can represent numbers
between 0 and 1 inclusive, but not numbers with whole parts like 2.718 or 3.14.
To begin we declare the storage item that will hold our accumulated product. You can see that the
trait provides a handy function for getting the identity value which we use to set the default
storage value to 1.
#[pallet::type_value]
pub(super) fn PermillAccumulatorDefaultValue<T: Config>() -> Permill {
	Permill::one()
}

#[pallet::storage]
#[pallet::getter(fn permill_value)]
pub(super) type PermillAccumulator<T: Config> =
	StorageValue<_, Permill, ValueQuery, PermillAccumulatorDefaultValue<T>>;
The only extrinsic for this Permill accumulator is the one that allows users to submit new Permill
values to get multiplied into the accumulator.
#[pallet::weight(10_000)]
pub fn update_permill(
	origin: OriginFor<T>,
	new_factor: Permill,
) -> DispatchResultWithPostInfo {
	ensure_signed(origin)?;

	let old_accumulated = Self::permill_value();

	// There is no need to check for overflow here. Permill holds values in the range
	// [0, 1] so it is impossible to ever overflow.
	let new_product = old_accumulated.saturating_mul(new_factor);

	// Write the new value to storage
	PermillAccumulator::<T>::put(new_product);

	// Emit event
	Self::deposit_event(Event::PermillUpdated(new_factor, new_product));
	Ok(().into())
}
The code of this extrinsic largely speaks for itself. One thing to take particular note of is that
we don't check for overflow on the multiplication. If you've read many of the recipes you know
that a Substrate runtime must never panic, and a developer must be extremely diligent in always
checking for and gracefully handling error conditions. Because Permill only holds values between 0
and 1, we know that their product will always be in that same range. Thus it is impossible to
overflow or saturate. So we can happily use saturating_mul and move on.
Substrate-fixed Accumulator
Substrate-fixed takes a more traditional approach
in that their types represent numbers with both whole and fractional parts. For this
implementation, we'll use the U16F16 type. This type contains an unsigned number (indicated by the
U at the beginning) and has 32 total bits of precision - 16 for the integer part, and 16 for the
fractional part. There are several other types provided that follow the same naming convention. Some
examples include U32F32 and I32F32 where the I indicates a signed number, just like in Rust
primitive types.
As in the Permill example, we begin by declaring the storage item. With substrate-fixed, there is
not a one function, but there is a from_num function that we use to set the storage item's
default value. This from_num method and its counterpart to-num are your primary ways of
converting between substrate-fixed types and Rust primitive types. If your use case does a lot of
fixed-point arithmetic, like ours does, it is advisable to keep your data in substrate-fixed types.
We're able to use
U16F16as a storage item type because it, and the other substrate-fixed types, implements the parity scale codec.
#[pallet::type_value]
pub(super) fn FixedAccumulatorDefaultValue<T: Config>() -> U16F16 {
	U16F16::from_num(1)
}

#[pallet::storage]
#[pallet::getter(fn fixed_value)]
pub(super) type FixedAccumulator<T: Config> =
	StorageValue<_, U16F16, ValueQuery, FixedAccumulatorDefaultValue<T>>;
Next we implement the extrinsic that allows users to update the accumulator by multiplying in a new value.
#[pallet::weight(10_000)]
pub fn update_fixed(
	origin: OriginFor<T>,
	new_factor: U16F16,
) -> DispatchResultWithPostInfo {
	ensure_signed(origin)?;

	let old_accumulated = Self::fixed_value();

	// Multiply, handling overflow
	let new_product = old_accumulated
		.checked_mul(new_factor)
		.ok_or(Error::<T>::Overflow)?;

	// Write the new value to storage
	FixedAccumulator::<T>::put(new_product);

	// Emit event
	Self::deposit_event(Event::FixedUpdated(new_factor, new_product));
	Ok(().into())
}
This extrinsic is quite similar to the Permill version with one notable difference. Because
U16F16 handles numbers greater than one, overflow is possible, and we need to handle it. The error
handling here is straightforward, the important part is just that you remember to do it.
This example has shown the fundamentals of substrate-fixed, but this library has much more to offer as we'll see in the compounding interest example.
Manual Accumulator
In this final accumulator implementation, we manually track fixed point numbers using Rust's native
u32 as the underlying data type. This example is educational, but is only practical in the
simplest scenarios. Generally you will have a more fun less error-prone time coding if you use
one of the previous two fixed-point types in your real-world applications.
Fixed point is not very complex conceptually. We represent fractional numbers as regular old
integers, and we decide in advance to consider some of the place values fractional. It's just like
saying we'll omit the decimal point when talking about money and all agree that "1995" actually
means 19.95 €. This is exactly how Substrate's
Balances pallet works, a tradition that's
been in blockchain since Bitcoin. In our example we will treat 16 bits as integer values, and 16 as
fractional, just as substrate-fixed's U16F16 did.
If you're rusty or unfamiliar with place values in the binary number system, it may be useful to brush up. (Or skip this detailed section and proceed to the compounding interest example.)
Normal interpretation of u32 place values
... ___ ___ ___ ___ ___ ___ ___ .
...  64  32  16  8   4   2   1

Fixed interpretation of u32 place values
... ___ ___ ___ ___ . ___ ___ ___ ___ ...
...  8   4   2   1    1/2 1/4 1/8 1/16...
Although the concepts are straight-forward, you'll see that manually implementing operations like multiplication is quite error prone. Therefore, when writing your own blockchain applications, it is often best to use one of the provided libraries covered in the other two implementations of the accumulator.
As before, we begin by declaring the storage value. This time around it is just a simple u32. But
the default value, 1 << 16 looks quite funny. If you haven't encountered it before << is Rust's
bit shift operator.
It takes a value and moves all the bits to the left. In this case we start with the value 1 and
move it 16 bits to the left. This is because Rust interprets 1 as a regular u32 value and puts
the 1 in the far right place value. But because we're treating this u32 specially, we need to
shift that bit to the middle just left of the imaginary radix point.
#[pallet::type_value]
pub(super) fn ManualAccumulatorDefaultValue<T: Config>() -> u32 {
	1 << 16
}
#[pallet::storage]
#[pallet::getter(fn manual_value)]
pub(super) type ManualAccumulator<T: Config> =
	StorageValue<_, u32, ValueQuery, ManualAccumulatorDefaultValue<T>>;
The extrinsic to multiply a new factor into the accumulator follows the same general flow as in the
other two implementations. In this case, there are more intermediate values calculated, and more
comments explaining the bit-shifting operations. In the function body most intermediate values are
held in u64 variables. This is because when you multiply two 32-bit numbers, you can end up with
as much as 64 bits in the product.
#[pallet::weight(10_000)]
pub fn update_manual(origin: OriginFor<T>, new_factor: u32) -> DispatchResultWithPostInfo {
	ensure_signed(origin)?;

	// To ensure we don't overflow unnecessarily, the values are cast up to u64 before multiplying.
	// This intermediate format has 48 integer positions and 16 fractional.
	let old_accumulated: u64 = Self::manual_value() as u64;
	let new_factor_u64: u64 = new_factor as u64;

	// Perform the multiplication on the u64 values
	// This intermediate format has 32 integer positions and 32 fractional.
	let raw_product: u64 = old_accumulated * new_factor_u64;

	// Right shift to restore the convention that 16 bits are fractional.
	// This is a lossy conversion.
	// This intermediate format has 48 integer positions and 16 fractional.
	let shifted_product: u64 = raw_product >> 16;

	// Ensure that the product fits in the u32, and error if it doesn't
	if shifted_product > (u32::max_value() as u64) {
		return Err(Error::<T>::Overflow.into());
	}

	let final_product = shifted_product as u32;

	// Write the new value to storage
	ManualAccumulator::<T>::put(final_product);

	// Emit event
	Self::deposit_event(Event::ManualUpdated(new_factor, final_product));
	Ok(().into())
}
As mentioned above, when you multiply two 32-bit numbers, you can end up with as much as 64 bits in the product. In this 64-bit intermediate product, we have 32 integer bits and 32 fractional. We can simply throw away the 16 right-most fractional bits that merely provide extra precision. But we need to be careful with the 16 left-most integer bits. If any of those bits are non-zero after the multiplication it means overflow has occurred. If they are all zero, then we can safely throw them away as well.
If this business about having more bits after the multiplication is confusing, try this exercise in the more familiar decimal system. Consider these numbers that have 4 total digits (2 integer, and two fractional): 12.34 and 56.78. Multiply them together. How many integer and fractional digits are in the product? Try that again with larger numbers like 98.76 and 99.99, and smaller like 00.11 and 00.22. Which of these products can be fit back into a 4-digit number like the ones we started with?
Compounding Interest
Many financial agreements involve interest for loaned or borrowed money. Compounding interest is when new interest is paid on top of not only the original loan amount, the so-called "principal", but also any interest that has been previously paid.
Discrete Compounding
Our first example will look at discrete compounding interest. This is when interest is paid at a fixed interval. In our case, interest will be paid every ten blocks.
For this implementation we've chosen to use Substrate's
Percent type. It works nearly the
same as Permill, but it represents numbers as "parts per hundred" rather than "parts per million".
We could also have used Substrate-fixed for this implementation, but chose to save it for the next
example.
The only storage item needed is a tracker of the account's balance. In order to focus on the
fixed-point- and interest-related topics, this pallet does not actually interface with a Currency.
Instead we just allow anyone to "deposit" or "withdraw" funds with no source or destination.
#[pallet::storage]
#[pallet::getter(fn discrete_account)]
	pub(super) type DiscreteAccount<T: Config> = StorageValue<_, u64, ValueQuery>;
There are two extrinsics associated with the discrete interest account. The deposit_discrete
extrinsic is shown here, and the withdraw_discrete extrinsic is nearly identical. Check it out in
the kitchen.
#[pallet::weight(10_000)]
pub fn deposit_discrete(
	origin: OriginFor<T>,
	val_to_add: u64,
) -> DispatchResultWithPostInfo {
	ensure_signed(origin)?;

	let old_value = DiscreteAccount::<T>::get();

	// Update storage for discrete account
	DiscreteAccount::<T>::put(old_value + val_to_add);

	// Emit event
	Self::deposit_event(Event::DepositedDiscrete(val_to_add));
	Ok(().into())
}
The flow of these deposit and withdraw extrinsics is entirely straight-forward. They each perform a simple addition or substraction from the stored value, and they have nothing to do with interest.
Because the interest is paid discretely every ten blocks it can be handled independently of deposits
and withdrawals. The interest calculation happens automatically in the on_finalize block.
#[pallet::hooks]
impl<T: Config> Hooks<T::BlockNumber> for Pallet<T> {
	fn on_finalize(n: T::BlockNumber) {
		// Apply newly-accrued discrete interest every ten blocks
		if (n % 10u32.into()).is_zero() {
			// Calculate interest Interest = principal * rate * time
			// We can use the `*` operator for multiplying a `Percent` by a u64
			// because `Percent` implements the trait Mul<u64>
			let interest = Self::discrete_interest_rate() * DiscreteAccount::<T>::get() * 10;

			// The following line, although similar, does not work because
			// u64 does not implement the trait Mul<Percent>
			// let interest = DiscreteAccount::get() * Self::discrete_interest_rate() * 10;

			// Update the balance
			let old_balance = DiscreteAccount::<T>::get();
			DiscreteAccount::<T>::put(old_balance + interest);

			// Emit the event
			Self::deposit_event(Event::DiscreteInterestApplied(interest));
		}
	}
}
on_finalize is called at the end of every block, but we only want to pay interest every ten
blocks, so the first thing we do is check whether this block is a multiple of ten. If it is we
calculate the interest due by the formula interest = principal * rate * time. As the comments
explain, there is some subtlety in the order of the multiplication. You can multiply PerCent * u64
but not u64 * PerCent.
Continuously Compounding
You can imagine increasing the frequency at which the interest is paid out. Increasing the frequency
enough approaches
continuously compounding interest.
Calculating continuously compounding interest requires the
exponential function which is not available
using Substrate's PerThing types. Luckily exponential and other
transcendental functions are available in
substrate-fixed, which is why we've chosen to use it for this example.
With continuously compounded interest, we could update the interest in on_finalize as we did
before, but it would need to be updated every single block. Instead we wait until a user tries to
use the account (to deposit or withdraw funds), and then calculate the account's current value "just
in time".
To facilitate this implementation, we represent the state of the account not only as a balance, but as a balance, paired with the time when that balance was last updated.
#[derive(Encode, Decode, Default)]
pub struct ContinuousAccountData<BlockNumber> {
	/// The balance of the account after last manual adjustment
	principal: I32F32,
	/// The time (block height) at which the balance was last adjusted
	deposit_date: BlockNumber,
}
You can see we've chosen substrate-fixed's I32F32 as our balance type this time. While we don't
intend to handle negative balances, there is currently a limitation in the transcendental functions
that requires using signed types.
With the struct to represent the account's state defined, we can initialize the storage value.
#[pallet::storage]
#[pallet::getter(fn balance_compound)]
pub(super) type ContinuousAccount<T: Config> =
	StorageValue<_, ContinuousAccountData<T::BlockNumber>, ValueQuery>;
As before, there are two relevant extrinsics, deposit_continuous and withdraw_continuous. They
are nearly identical so we'll only show one.
#[pallet::weight(10_000)]
fn deposit_continuous(origin: OriginFor<T>, val_to_add: u64) -> DispatchResultWithPostInfo {
ensure_signed(origin)?;
let current_block = frame_system::Module::<T>::block_number();
let old_value = Self::value_of_continuous_account(¤t_block);
// Update storage for compounding account
ContinuousAccount::<T>::put(ContinuousAccountData {
principal: old_value + I32F32::from_num(val_to_add),
deposit_date: current_block,
});
// Emit event
Self::deposit_event(Event::DepositedContinuous(val_to_add));
Ok(().into())
}
This function itself isn't too insightful. It does the same basic things as the discrete variant: look up the old value and the deposit, update storage, and emit an event. The one interesting part is that it calls a helper function to get the account's previous value. This helper function calculates the value of the account considering all the interest that has accrued since the last time the account was touched. Let's take a closer look.
fn value_of_continuous_account(now: &<T as frame_system::Config>::BlockNumber) -> I32F32 {
	// Get the old state of the accout
	let ContinuousAccountData{
		principal,
		deposit_date,
	} = ContinuousAccount::<T>::get();

	// Calculate the exponential function (lots of type conversion)
	let elapsed_time_block_number = *now - deposit_date;
	let elapsed_time_u32 = TryInto::try_into(elapsed_time_block_number)
		.expect("blockchain will not exceed 2^32 blocks; qed");
	let elapsed_time_i32f32 = I32F32::from_num(elapsed_time_u32);
	let exponent : I32F32 = Self::continuous_interest_rate() * elapsed_time_i32f32;
	let exp_result : I32F32 = exp(exponent)
		.expect("Interest will not overflow account (at least not until the learner has learned enough about fixed point :)");

	// Return the result interest = principal * e ^ (rate * time)
	principal * exp_result
}
This function gets the previous state of the account, makes the interest calculation and returns the
result. The reality of making these fixed point calculations is that type conversion will likely be
your biggest pain point. Most of the lines are doing type conversion between the BlockNumber,
u32, and I32F32 types.
We've already seen that this helper function is used within the runtime for calculating the current balance "just in time" to make adjustments. In a real-world scenario, chain users would also want to check their balance at any given time. Because the current balance is not stored in runtime storage, it would be wise to implement a runtime API so this helper can be called from outside the runtime.
Off-chain Workers
Here we focus on building off-chain workers in Substrate. To read more about what off-chain workers are, why you want to use them, and what kinds of problems they solve best. Please goto our guide.
Off-chain workers allow your Substrate node to offload tasks that take too long or too much CPU / memory resources to compute, or have non-deterministic result. In particular there are a set of helpers allowing fetching of HTTP requests and parsing for JSON. It also provides storage that is specific to the particular Substrate node and not shared across the network. Off-chain workers can also submit either signed or unsigned transactions back on-chain.
We will deep-dive into each of the topics below.
- Signed and Unsigned Transactions
- HTTP fetching and JSON parsing
- Local storage in Off-chain Workers
- Off-chain Indexing
Transactions in Off-chain Workers
pallets/ocw-demo
Compiling this Pallet
This ocw-demo pallet is included in the
ocw-runtime.
In order to use this runtime in the kitchen node, we open the nodes/kitchen-node/Cargo.toml file,
enable the ocw-runtime package and comment out the super-runtime package.
Then we build the kitchen node with ocw feature flag:
# Switch to kitchen-node directory
cd nodes/kitchen-node

# Compile with OCW feature
cargo build --release --features ocw
With this feature flag, an account key is injected into the Substrate node keystore.
src:
nodes/kitchen-node/src/service.rs
#![allow(unused)]
fn main() {
// Initialize seed for signing transaction using off-chain workers
#[cfg(feature = "ocw")]
{
  sp_keystore::SyncCryptoStore::sr25519_generate_new(
    &*keystore,
    runtime::ocw_demo::KEY_TYPE,
    Some("//Alice"),
  )
  .expect("Creating key with account Alice should succeed.");
}
}
Life-cycle of Off-chain Worker
Running the kitchen-node you will see log messages similar to the following:
2021-04-09 16:30:21 Running in --dev mode, RPC CORS has been disabled.
2021-04-09 16:30:21 Kitchen Node
2021-04-09 16:30:21 ✌️  version 3.0.0-6a528b4-x86_64-linux-gnu
2021-04-09 16:30:21 ❤️  by Substrate DevHub <https://github.com/substrate-developer-hub>, 2019-2021
2021-04-09 16:30:21 📋 Chain specification: Development
2021-04-09 16:30:21 🏷 Node name: needless-body-2155
2021-04-09 16:30:21 👤 Role: AUTHORITY
2021-04-09 16:30:21 💾 Database: RocksDb at /tmp/substratek7h0lC/chains/dev/db
2021-04-09 16:30:21 ⛓  Native runtime: ocw-runtime-1 (ocw-runtime-1.tx1.au1)
2021-04-09 16:30:21 🔨 Initializing Genesis block/state (state: 0xe76c…ae9b, header-hash: 0x3e88…db95)
2021-04-09 16:30:21 Using default protocol ID "sup" because none is configured in the chain specs
2021-04-09 16:30:21 🏷 Local node identity is: 12D3KooWPwkfdk29ZeqfSF8acAgRR6ToTofjQq11PYhi9WDpQijq
2021-04-09 16:30:22 📦 Highest known block at #0
2021-04-09 16:30:22 〽️ Prometheus server started at 127.0.0.1:9615
2021-04-09 16:30:22 Listening for new connections on 127.0.0.1:9944.
2021-04-09 16:30:27 💤 Idle (0 peers), best: #0 (0x3e88…db95), finalized #0 (0x3e88…db95), ⬇ 0 ⬆ 0
...
First, pay attention the line ⛓ Native runtime: ocw-runtime-1 (ocw-runtime-1.tx1.au1)
to ensure we are running the kitchen-node with the ocw-runtime.
Other than that, you will realized the chain is just sitting idled. This is because currently off-chain worker is only run after a block is imported. Our kitchen node is configured to use instant-seal consensus, meaning that we need to send a transaction to trigger a block to be imported.
Once a transaction is sent, such as using Polkadot-JS App to perform a balance transfer, the following more interesting logs are shown.
2021-04-09 16:32:13 🙌 Starting consensus session on top of parent 0x3e88096c5794c8a8ba5b81994a5f7b5dcd48c013413afae94c92cd9eb851db95
2021-04-09 16:32:13 🎁 Prepared block for proposing at 1 [hash: 0x2ad95670b92fd9bc46be6e948eae6cbd8e420e61055bc67245c2698669d44508; parent_hash: 0x3e88…db95; extrinsics (2): [0x6e19…1309, 0x8927…b1a3]]
2021-04-09 16:32:13 Instant Seal success: CreatedBlock { hash: 0x2ad95670b92fd9bc46be6e948eae6cbd8e420e61055bc67245c2698669d44508, aux: ImportedAux { header_only: false, clear_justification_requests: false, needs_justification: false, bad_justification: false, is_new_best: true } }
2021-04-09 16:32:13 ✨ Imported #1 (0x2ad9…4508)
2021-04-09 16:32:13 Entering off-chain worker
2021-04-09 16:32:13 🙌 Starting consensus session on top of parent 0x2ad95670b92fd9bc46be6e948eae6cbd8e420e61055bc67245c2698669d44508
2021-04-09 16:32:13 submit_number_unsigned: 1
2021-04-09 16:32:13 Number vector: [1]
...
Let's take a deeper look at what's happening here. Referring to the code at
pallets/ocw-demo/src/lib.rs,
there is an fn offchain_worker() function inside decl_module!. This is the entry point of the
off-chain worker logic which is executed once per block import.
As off-chain workers, by definition, run computation off-chain, they cannot alter the block state directly. In order to do so, they need to send transactions back on-chain. Three kinds of transaction can be sent here:
- Signed transactions are used if the transaction requires the sender to be specified.
- Unsigned transactions are used when the sender does not need to be known.
- Unsigned transactions with signed payloads are used if the transaction requires the sender to be specified but the sender account not be charged for the transaction fee.
We will walk through each of them in the following.
Signed Transactions
Notes: This example will have account
Alicesubmitting signed transactions to the node in the off-chain worker, and these transactions have associated fees. If you run the node in development mode (with--devflag) using the default sr25519 crypto signature,Alicewill have sufficient funds initialized in the chain and this example will run fine. Otherwise, please be awareAliceaccount must be funded to run this example.
Setup: Pallet ocw-demo
For signed transactions, we have to define a crypto signature sub-module:
src:
pallets/ocw-demo/src/lib.rs
#![allow(unused)]
fn main() {
pub const KEY_TYPE: KeyTypeId = KeyTypeId(*b"demo");

pub mod crypto {
	use crate::KEY_TYPE;
	use sp_runtime::app_crypto::{app_crypto, sr25519};
	// -- snip --
	app_crypto!(sr25519, KEY_TYPE);
}
}
KEY_TYPE is the application key prefix for the pallet in the underlying storage. This is to be used
for signing transactions.
Second, we have our pallet configration trait be additionally bounded by CreateSignedTransaction
and add an additional associated type AuthorityId. This tell the runtime that this pallet can
create signed transactions.
src:
pallets/ocw-demo/src/lib.rs
#![allow(unused)]
fn main() {
pub trait Config: frame_system::Config + CreateSignedTransaction<Call<Self>> {
	/// The identifier type for an offchain worker.
	type AuthorityId: AppCrypto<Self::Public, Self::Signature>;
	// -- snip --
}
}
Setup: Runtime ocw-runtime
Going back to our runtime ocw-runtime, in addition of implementing the pallet
configuration trait ocw_demo::Config, we also implement
frame_system::offchain::CreateSignedTransaction,
frame_system::offchain::SigningTypes, and frame_system::offchain::SendTransactionTypes.
src:
runtimes/ocw-runtime/src/lib.rs
#![allow(unused)]
fn main() {
pub type SignedPayload = generic::SignedPayload<Call, SignedExtra>;

impl ocw_demo::Config for Runtime {
  type AuthorityId = ocw_demo::crypto::TestAuthId;
  type Call = Call;
  type Event = Event;
}

impl<LocalCall> frame_system::offchain::CreateSignedTransaction<LocalCall> for Runtime
where
	Call: From<LocalCall>,
{
	fn create_transaction<C: frame_system::offchain::AppCrypto<Self::Public, Self::Signature>>(
		call: Call,
		public: <Signature as sp_runtime::traits::Verify>::Signer,
		account: AccountId,
		index: Index,
	) -> Option<(
		Call,
		<UncheckedExtrinsic as sp_runtime::traits::Extrinsic>::SignaturePayload,
	)> {
		let period = BlockHashCount::get() as u64;
		let current_block = System::block_number()
			.saturated_into::<u64>()
			.saturating_sub(1);
		let tip = 0;
		let extra: SignedExtra = (
			frame_system::CheckTxVersion::<Runtime>::new(),
			frame_system::CheckGenesis::<Runtime>::new(),
			frame_system::CheckEra::<Runtime>::from(generic::Era::mortal(period, current_block)),
			frame_system::CheckNonce::<Runtime>::from(index),
			frame_system::CheckWeight::<Runtime>::new(),
			pallet_transaction_payment::ChargeTransactionPayment::<Runtime>::from(tip),
		);

		#[cfg_attr(not(feature = "std"), allow(unused_variables))]
		let raw_payload = SignedPayload::new(call, extra)
			.map_err(|e| {
				debug::native::warn!("SignedPayload error: {:?}", e);
			})
			.ok()?;

		let signature = raw_payload.using_encoded(|payload| C::sign(payload, public))?;

		let address = account;
		let (call, extra, _) = raw_payload.deconstruct();
		Some((call, (address, signature, extra)))
	}
}

// -- snip --
}
Let's focus on the CreateSignedTransaction implementation first.
The overall objective here is to perform the following:
- Signing the on-chain
callandextrapayload of the call. This together is called the signature. - Finally returning the on-chain
call, the account/address making the signature, the signature itself, and theextrapayload.
Next, the remaining two traits are also implemented.
src:
runtimes/ocw-runtime/src/lib.rs
#![allow(unused)]
fn main() {
impl frame_system::offchain::SigningTypes for Runtime {
  type Public = <Signature as sp_runtime::traits::Verify>::Signer;
  type Signature = Signature;
}

impl<C> frame_system::offchain::SendTransactionTypes<C> for Runtime
where
  Call: From<C>,
{
  type OverarchingCall = Call;
  type Extrinsic = UncheckedExtrinsic;
}
}
By now, we have completed the setup of implementing the necessary trait for our runtime to create signed transactions.
Sending Signed Transactions
A signed transaction is sent with frame_system::offchain::SendSignedTransaction::send_signed_transaction,
as shown below:
src:
pallets/ocw-demo/src/lib.rs
#![allow(unused)]
fn main() {
fn offchain_signed_tx(block_number: T::BlockNumber) -> Result<(), Error<T>> {
	// We retrieve a signer and check if it is valid.
	//   Since this pallet only has one key in the keystore. We use `any_account()1 to
	//   retrieve it. If there are multiple keys and we want to pinpoint it, `with_filter()` can be chained,
	//   ref: https://substrate.dev/rustdocs/v3.0.0/frame_system/offchain/struct.Signer.html
	let signer = Signer::<T, T::AuthorityId>::any_account();

	// Translating the current block number to number and submit it on-chain
	let number: u64 = block_number.try_into().unwrap_or(0) as u64;

	// `result` is in the type of `Option<(Account<T>, Result<(), ()>)>`. It is:
	//   - `None`: no account is available for sending transaction
	//   - `Some((account, Err(())))`: error occured when sending the transaction
	//   - `Some((account, Ok(())))`: transaction is successfully sent
	let result = signer.send_signed_transaction(|_acct|
		// This is the on-chain function
		Call::submit_number_signed(number)
	);

	// Display error if the signed tx fails.
	if let Some((acc, res)) = result {
		if res.is_err() {
			debug::error!("failure: offchain_signed_tx: tx sent: {:?}", acc.id);
			return Err(<Error<T>>::OffchainSignedTxError);
		}
		// Transaction is sent successfully
		return Ok(());
	}

	// The case of `None`: no account is available for sending
	debug::error!("No local account available");
	Err(<Error<T>>::NoLocalAcctForSignedTx)
}
}
On the above code, we first retrieve a signer. Then we send a signed transaction on-chain by calling
send_signed_transaction with a closure returning the on-chain call,
Call::submit_number_signed(number).
Then we use the signer to send signed transaction, and the result is in the type of
Option<(Account<T>, Result<(), ()>)>. So we handle each of the following cases:
None: when no account is available for sending transactionSome((account, Err(()))): when an error occured when sending the transactionSome((account, Ok(()))): when transaction is successfully sent
Eventually, the call transaction is made on-chain via the
frame_system::offchain::CreateSignedTransaction::create_transaction() function we defined in our
runtime.
Unsigned Transactions
Setup: Pallet ocw-demo
By default unsigned transactions are rejected by the runtime unless they are explicitly allowed. So we write the logic to validate unsigned transactions:
src:
pallets/ocw-demo/src/lib.rs
#![allow(unused)]
fn main() {
impl<T: Config> frame_support::unsigned::ValidateUnsigned for Module<T> {
	type Call = Call<T>;

	fn validate_unsigned(_source: TransactionSource, call: &Self::Call) -> TransactionValidity {
		let valid_tx = |provide| ValidTransaction::with_tag_prefix("ocw-demo")
			.priority(T::UnsignedPriority::get())
			.and_provides([&provide])
			.longevity(3)
			.propagate(true)
			.build();

		match call {
			Call::submit_number_unsigned(_number) => valid_tx(b"submit_number_unsigned".to_vec()),
			// -- snip --
			_ => InvalidTransaction::Call.into(),
		}
	}
}
}
We implement the ValidateUnsigned trait for Module, and add the allowance logic inside
validate_unsigned function. We verify that if the call is Call::submit_number_unsigned we return
a ValidTransaction object using the builder pattern.
The ValidTransaction object contains certain fields:
priority: determine the ordering of two transactions, given their dependencies are satisfied.provides: contain a list of tags provided by this transaction. Successfully importing the transaction will enable other transactions that depend on these tags be included. Using bothprovidesandrequirestags allow Substrate to build a dependency graph of transactions and import them in the right order.longevity: this transaction longevity describes the minimum number of blocks the transaction has to be valid for. After this period the transaction should be removed from the pool or revalidated.propagate: indicate if the transaction should be propagated to other peers. By setting tofalsethe transaction will still be considered for inclusion in blocks on the current node but will never be sent to other peers.
Setup: Runtime ocw-runtime
Finally, to tell the runtime that we have our own ValidateUnsigned logic, we need to pass
this as a parameter when constructing the runtime:
src:
runtimes/ocw-runtime/src/lib.rs
#![allow(unused)]
fn main() {
construct_runtime!(
	pub enum Runtime where
		Block = Block,
		NodeBlock = opaque::Block,
		UncheckedExtrinsic = UncheckedExtrinsic
	{
		//...snip
		OcwDemo: ocw_demo::{Module, Call, Storage, Event<T>, ValidateUnsigned},
	}
);
}
Sending Unsigned Transactions
We can now send an unsigned transaction from offchain worker with the
T::SubmitUnsignedTransaction::submit_unsigned function, as shown in the code.
src:
pallets/ocw-demo/src/lib.rs
#![allow(unused)]
fn main() {
fn offchain_unsigned_tx(block_number: T::BlockNumber) -> Result<(), Error<T>> {
	let number: u64 = block_number.try_into().unwrap_or(0) as u64;
	let call = Call::submit_number_unsigned(number);

	// `submit_unsigned_transaction` returns a type of `Result<(), ()>`
	//   ref: https://substrate.dev/rustdocs/v3.0.0/frame_system/offchain/struct.SubmitTransaction.html#method.submit_unsigned_transaction
	SubmitTransaction::<T, Call<T>>::submit_unsigned_transaction(call.into())
		.map_err(|_| {
			debug::error!("Failed in offchain_unsigned_tx");
			<Error<T>>::OffchainUnsignedTxError
		})
}
}
As in signed transactions, we prepare a function reference with its parameters and call
frame_system::offchain::SubmitTransaction::submit_unsigned_transaction.
Unsigned Transactions with Signed Payloads
With this type of transaction, we first specify a signer, sign the transaction, and then send it back on-chain as unsigned transaction. The main difference with signed transactions is that the signer account will not be charged for the transaction fee. This is not the case for signed transaction normally.
But this could potentially be an attack vector, so extra precaution should be added as to what counted as a valid unsigned transaction.
Since we are still sending unsigned transactions, we need to add extra code in ValidateUnsigned
implementation to validate them.
Sending Unsigned Transactions with Signed Payloads
We send unsigned transactions with signed payloads as followed.
src:
pallets/ocw-demo/src/lib.rs
#![allow(unused)]
fn main() {
fn offchain_unsigned_tx_signed_payload(block_number: T::BlockNumber) -> Result<(), Error<T>> {
	// Retrieve the signer to sign the payload
	let signer = Signer::<T, T::AuthorityId>::any_account();

	let number: u64 = block_number.try_into().unwrap_or(0) as u64;

	// `send_unsigned_transaction` is returning a type of `Option<(Account<T>, Result<(), ()>)>`.
	//   Similar to `send_signed_transaction`, they account for:
	//   - `None`: no account is available for sending transaction
	//   - `Some((account, Ok(())))`: transaction is successfully sent
	//   - `Some((account, Err(())))`: error occured when sending the transaction
	if let Some((_, res)) = signer.send_unsigned_transaction(
		|acct| Payload { number, public: acct.public.clone() },
		Call::submit_number_unsigned_with_signed_payload
	) {
		return res.map_err(|_| {
			debug::error!("Failed in offchain_unsigned_tx_signed_payload");
			<Error<T>>::OffchainUnsignedTxSignedPayloadError
		});
	} else {
    // The case of `None`: no account is available for sending
    debug::error!("No local account available");
    Err(<Error<T>>::NoLocalAcctForSigning)
  }
}
}
What is unique here is that
send_unsigned_transaction function takes two functions. The first, expressed as a closure,
returns a SignedPayload object, and the second returns an on-chain call to be made.
We have defined our SignedPayload object earlier in the pallet.
src:
pallets/ocw-demo/src/lib.rs
#![allow(unused)]
fn main() {
#[derive(Encode, Decode, Clone, PartialEq, Eq, RuntimeDebug)]
pub struct Payload<Public> {
	number: u64,
	public: Public
}

impl <T: SigningTypes> SignedPayload<T> for Payload<T::Public> {
	fn public(&self) -> T::Public {
		self.public.clone()
	}
}
}
Conclusion
By now, you should be able to code your own off-chain workers that send signed transactions, unsigned transactions, and unsigned transactions with signed payloads back on chain.
HTTP Fetching and JSON Parsing in Off-chain Workers
pallets/ocw-demo
HTTP Fetching
In traditional web apps, we use HTTP requests to communicate with and fetch data from third-party APIs. But this is tricky when we want to perform this in Substrate runtime on chain. First, HTTP requests are indeterministic. There are uncertainty in terms of how long the request will take, and the result may not be the same all the time. This causes problem for the network reaching consensus.
So in Substrate runtime, we use off-chain workers to issue HTTP requests and fetching the results back.
In this chapter, we will dive into fetching data using GitHub RESTful API on the organization substrate-developer-hub
that hosts this recipe.
We issue an http request and return the JSON string in byte vector inside the fetch_from_remote()
function.
src:
pallets/ocw-demo/src/lib.rs
#![allow(unused)]
fn main() {
fn fetch_from_remote() -> Result<Vec<u8>, Error<T>> {
  // Initiate an external HTTP GET request. This is using high-level wrappers from `sp_runtime`.
  let request = rt_offchain::http::Request::get(HTTP_REMOTE_REQUEST);

  // Keeping the offchain worker execution time reasonable, so limiting the call to be within 3s.
  let timeout = sp_io::offchain::timestamp()
  	.add(rt_offchain::Duration::from_millis(FETCH_TIMEOUT_PERIOD));

  // For github API request, we also need to specify `user-agent` in http request header.
  //   See: https://developer.github.com/v3/#user-agent-required
  let pending = request
  	.add_header("User-Agent", HTTP_HEADER_USER_AGENT)
  	.deadline(timeout) // Setting the timeout time
  	.send() // Sending the request out by the host
  	.map_err(|_| <Error<T>>::HttpFetchingError)?;

  // By default, the http request is async from the runtime perspective. So we are asking the
  //   runtime to wait here.
  // The returning value here is a `Result` of `Result`, so we are unwrapping it twice by two `?`
  //   ref: https://substrate.dev/rustdocs/v3.0.0/sp_runtime/offchain/http/struct.PendingRequest.html#method.try_wait
  let response = pending
  	.try_wait(timeout)
  	.map_err(|_| <Error<T>>::HttpFetchingError)?
  	.map_err(|_| <Error<T>>::HttpFetchingError)?;

  if response.code != 200 {
  	debug::error!("Unexpected http request status code: {}", response.code);
  	return Err(<Error<T>>::HttpFetchingError);
  }

  // Next we fully read the response body and collect it to a vector of bytes.
  Ok(response.body().collect::<Vec<u8>>())
}
}
On the above code, we first create a request object request, and set a timeout period so the http request does not hold
indefinitely with .deadline(timeout). For querying github APIs, we also need to add an extra HTTP
header of user-agent with add_header(...). HTTP requests from off-chain workers are fetched asynchronously. Here
we use try_wait() to wait for the result to come back, and terminate and return if any errors occured, i.e. returning non-200 http response code.
Finally we get the response back from response.body()
iterator. Since we are in a no_std environment, we collect them back as a byte vector instead of a string and return.
JSON Parsing
We frequently get data back in JSON format when requesting from HTTP APIs. The next task is to parse the JSON
and fetch the required key-value pairs out. This is demonstrated in the fetch_n_parse function.
Setup
In Rust, serde and serde-json are the popular combo-package used for JSON parsing.
src: pallets/ocw-demo/Cargo.toml
#--snip--

[dependencies]
#--snip--

serde = { version = '1.0.100', default-features = false, features = ['derive'] }
serde_json = { version = '1.0.45', default-features = false, features = ['alloc'] }


#--snip--
Deserializing JSON string to struct
Then we use the usual serde-derive approach on deserializing. First we define the struct with
fields that we are interested to extract out.
src:
pallets/ocw-demo/src/lib.rs
#![allow(unused)]
fn main() {
use serde::{Deserialize, Deserializer};

// ref: https://serde.rs/container-attrs.html#crate
#[derive(Deserialize, Encode, Decode, Default)]
struct GithubInfo {
	// Specify our own deserializing function to convert JSON string to vector of bytes
	#[serde(deserialize_with = "de_string_to_bytes")]
	login: Vec<u8>,
	#[serde(deserialize_with = "de_string_to_bytes")]
	blog: Vec<u8>,
	public_repos: u32,
}
}
By default, serde deserializes JSON strings to the String datatype. We want to write our own
deserializer to convert it to vector of bytes.
#![allow(unused)]
fn main() {
pub fn de_string_to_bytes<'de, D>(de: D) -> Result<Vec<u8>, D::Error>
where D: Deserializer<'de> {
	let s: &str = Deserialize::deserialize(de)?;
	Ok(s.as_bytes().to_vec())
}
}
Now the actual deserialization takes place in the fetch_n_parse function.
#![allow(unused)]
fn main() {
/// Fetch from remote and deserialize the JSON to a struct
fn fetch_n_parse() -> Result<GithubInfo, Error<T>> {
	let resp_bytes = Self::fetch_from_remote()
		.map_err(|e| {
			debug::error!("fetch_from_remote error: {:?}", e);
			<Error<T>>::HttpFetchingError
		})?;

	let resp_str = str::from_utf8(&resp_bytes)
		.map_err(|_| <Error<T>>::HttpFetchingError)?;

	// Deserializing JSON to struct, thanks to `serde` and `serde_derive`
	let gh_info: GithubInfo = serde_json::from_str(&resp_str).map_err(|_| <Error<T>>::HttpFetchingError)?;
	Ok(gh_info)
}
}
Conclusion
In this chapter, we go over how to construct an HTTP request and send it out to the
GitHub API remote endpoint. We then demonstrate how to use serde library to
parse the JSON string we retrieved in the HTTP response into a data structure that
we can further manipulate in our runtime.
Local Storage in Off-chain Workers
pallets/ocw-demo
Remember we mentioned that off-chain workers (or ocw for short) cannot write directly to the blockchain state? This is why they have to submit transactions back on-chain. Fortunately, there is also local storage that persist across runs in off-chain workers. Storage is only local to off-chain workers and is not passed within the blockchain network.
Off-chain workers are asynchronously run at the end of block import. Since ocws are not limited by how long they run, at any single instance there could be multiple ocw instances running, being initiated by previous block imports. See diagram below.
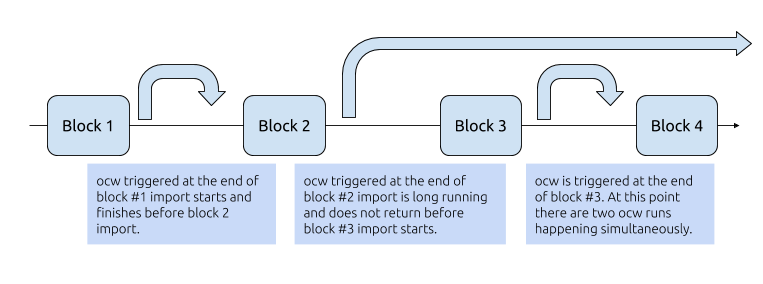
The storage has a similar API as their on-chain counterpart with get, set, and mutate. mutate is
using a compare-and-set pattern. It compares the
contents of a memory location with a given value and, only if they are the same, modifies the
contents of that memory location to a new given value. This is done as a single atomic operation.
The atomicity guarantees that the new value is calculated based on up-to-date information; if the
value had been updated by another thread in the meantime, the write would fail.
In this recipe, we will add a cache and lock over our previous http fetching example. If the cached value existed, we will return using the cached value. Otherwise we acquire the lock, fetch from github public API, and save it to the cache.
Setup
In the fetch_github_info() function, we first define a storage reference used by the off-chain
worker.
#![allow(unused)]
fn main() {
fn fetch_github_info() -> Result<(), Error<T>> {
	// Create a reference to Local Storage value.
	// Since the local storage is common for all offchain workers, it's a good practice
	// to prepend our entry with the pallet name.
	let s_info = StorageValueRef::persistent(b"offchain-demo::gh-info");
	// ...
}
}
We pass in a key as our storage key. As all storage keys share a single global namespace, a good practice would be to prepend the pallet name in front of our storage key, as we have done above.
Access
Once we have the storage reference, we can access the storage via get, set, and mutate. Let's
demonstrate the mutate function as the usage of the remaining two functions are pretty
self-explanatory.
We first check if the github info has been fetched and cached.
#![allow(unused)]
fn main() {
fn fetch_github_info() -> Result<(), Error<T>> {
	// -- snip --
	if let Some(Some(gh_info)) = s_info.get::<GithubInfo>() {
		// gh-info has already been fetched. Return early.
		debug::info!("cached gh-info: {:?}", gh_info);
		return Ok(());
	}
	// -- snip --
}
}
We then define a lock and try to acquire it before fetching github info.
#![allow(unused)]
fn main() {
fn fetch_github_info() -> Result<(), Error<T>> {
	// -- snip --

	let mut lock = StorageLock::<BlockAndTime<Self>>::with_block_and_time_deadline(
		b"offchain-demo::lock",
		LOCK_BLOCK_EXPIRATION,
		rt_offchain::Duration::from_millis(LOCK_TIMEOUT_EXPIRATION)
	);

	// -- snip --
}
}
In the above code, we first define a lock by giving it a name and set the time limit. The time limit can be specified by providing number of blocks to wait, amount of time to wait, or both (whichever is shorter).
We then perform the fetch after the lock is acquired.
#![allow(unused)]
fn main() {
fn fetch_if_needed() -> Result<(), Error<T>> {
	// ...
	if let Ok(_guard) = lock.try_lock() {
		match Self::fetch_n_parse() {
			Ok(gh_info) => { s_info.set(&gh_info); }
			Err(err) => { return Err(err); }
		}
	}

	Ok(())
}
}
Finally when the _guard variable goes out of scope, the lock is released.
Conclusion
In this chapter, we demonstrate how to define a persistent storage value and a storage lock that set the locking time limit by either number of block passed or time passed, or both. Finally we demonstrate how to acquire the lock, perform a relatively long process (fetching data externally) and writing the data back to the storage.
Reference
Off-chain Indexing
There are times when on-chain extrinsics need to pass data to the off-chain worker context with predictable write behavior. We can surely pass this piece of data via on-chain storage, but this is costly and it will make the data propagate among the blockchain network. If this is not a piece of information that need to be saved on-chain, another way is to save this data in off-chain local storage via off-chain indexing.
As off-chain indexing is called in on-chain context, if it is agreed upon by the blockchain consensus mechanism, then it is expected to run predictably by all nodes in the network. One use case is to store only the hash of certain information in on-chain storage for verification purpose but keeping the full data set off-chain for lookup later. In this case the original data can be saved via off-chain indexing.
Notice as off-chain indexing is called and data is saved on every block import (this also includes
forks), the consequence is that in case non-unique keys are used the data might be overwritten by different forked blocks and the content of off-chain database will be different between nodes.
Care should be taken in choosing the right indexing key to prevent potential overwrites if not
desired.
We will demonstrate this in ocw-demo pallet.
Knowledge discussed in this chapter built upon using local storage in off-chain worker context.
Notes
In order to see the off-chain indexing feature in effect, please run the kitchen node with off-chain indexing flag on, as
./target/release/kitchen-node --dev --tmp --enable-offchain-indexing true
Writing to Off-chain Storage From On-chain Context
src: pallets/ocw-demo/src/lib.rs
#![allow(unused)]
fn main() {
#[derive(Debug, Deserialize, Encode, Decode, Default)]
struct IndexingData(Vec<u8>, u64);

const ONCHAIN_TX_KEY: &[u8] = b"ocw-demo::storage::tx";

// -- snip --

pub fn submit_number_signed(origin, number: u64) -> DispatchResult {
  // -- snip --
  let key = Self::derived_key(frame_system::Module::<T>::block_number());
  let data = IndexingData(b"submit_number_unsigned".to_vec(), number);
  offchain_index::set(&key, &data.encode());
}

impl<T: Config> Module<T> {
  fn derived_key(block_number: T::BlockNumber) -> Vec<u8> {
    block_number.using_encoded(|encoded_bn| {
      ONCHAIN_TX_KEY.clone().into_iter()
        .chain(b"/".into_iter())
        .chain(encoded_bn)
        .copied()
        .collect::<Vec<u8>>()
    })
  }
}
}
We first define a key used in the local off-chain storage. It is formed in the derive_key function
that append an encoded block number to a pre-defined prefix. Then we write to the storage with
offchain_index::set(key, value) function. Here offchain_index::set() accepts values in byte
format (&[u8]) so we encode the data structure IndexingData first. If you refer back to
offchain_index API rustdoc,
you will see there are only set() and clear() functions. This means from the on-chain context,
we only expect to write to this local off-chain storage location but not reading from it, and we
cannot pass data within on-chain context using this method.
Reading the Data in Off-chain Context
src: pallets/ocw-demo/src/lib.rs
#![allow(unused)]
fn main() {
fn offchain_worker(block_number: T::BlockNumber) {
  // -- snip --

  // Reading back the off-chain indexing value. It is exactly the same as reading from
  // ocw local storage.
  let key = Self::derived_key(block_number);
  let oci_mem = StorageValueRef::persistent(&key);

  if let Some(Some(data)) = oci_mem.get::<IndexingData>() {
    debug::info!("off-chain indexing data: {:?}, {:?}",
      str::from_utf8(&data.0).unwrap_or("error"), data.1);
  } else {
    debug::info!("no off-chain indexing data retrieved.");
  }

  // -- snip --
}
}
We read the data back in the offchain_worker() function as we would normally read from the
local off-chain storage. We first specify the memory space with StorageValueRef::persistent() with
its key, and then read back the data with get and decode it to IndexingData.
Reference
Currency Types
pallets/lockable-currency
pallets/reservable-currency
pallets/currency-imbalances
Just Plain Currency
To use a balance type in the runtime, import the
Currency trait from
frame_support.
use frame_support::traits::Currency;
The Currency trait provides an abstraction over a
fungible assets system. To use such a fungible asset
from your pallet, include an associated type with the Currency trait bound in your pallet's
configuration trait.
pub trait Config: frame_system::Config {
	type Currency: Currency<Self::AccountId>;
}
Defining an associated type with this trait bound allows this pallet to access the provided methods
of Currency. For example, it
is straightforward to check the total issuance of the system:
// in decl_module block
T::Currency::total_issuance();
As promised, it is also possible to type alias a balances type for use in the runtime:
type BalanceOf<T> = <<T as Trait>::Currency as Currency<<T as frame_system::Config>::AccountId>>::Balance;
This new BalanceOf<T> type satisfies the type constraints of Self::Balance for the provided
methods of Currency. This means that this type can be used for
transfer,
minting,
and much more.
Reservable Currency
Substrate's Treasury pallet uses the
Currency type for bonding spending proposals. To reserve and unreserve funds for bonding,
treasury uses the
ReservableCurrency
trait. The import and associated type declaration follow convention
use frame_support::traits::{Currency, ReservableCurrency};

pub trait Config: frame_system::Config {
	type Currency: Currency<Self::AccountId> + ReservableCurrency<Self::AccountId>;
}
To lock or unlock some quantity of funds, it is sufficient to invoke reserve and unreserve
respectively
#[pallet::weight(10_000)]
pub fn reserve_funds(
	origin: OriginFor<T>,
	amount: BalanceOf<T>,
	) -> DispatchResultWithPostInfo {
		let locker = ensure_signed(origin)?;

		T::Currency::reserve(&locker, amount)
			.map_err(|_| "locker can't afford to lock the amount requested")?;

		let now = <frame_system::Module<T>>::block_number();

		Self::deposit_event(Event::LockFunds(locker, amount, now));
		Ok(().into())
}
#[pallet::weight(10_000)]
pub fn unreserve_funds(
	origin: OriginFor<T>,
	amount: BalanceOf<T>,
	) -> DispatchResultWithPostInfo {
		let unlocker = ensure_signed(origin)?;

		T::Currency::unreserve(&unlocker, amount);
		// ReservableCurrency::unreserve does not fail (it will lock up as much as amount)

		let now = <frame_system::Module<T>>::block_number();

		Self::deposit_event(Event::UnlockFunds(unlocker, amount, now));
		Ok(().into())
}
Lockable Currency
Substrate's Staking pallet similarly uses
LockableCurrency
trait for more nuanced handling of capital locking based on time increments. This type can be very
useful in the context of economic systems that enforce accountability by collateralizing fungible
resources. Import this trait in the usual way
use frame_support::traits::{LockIdentifier, LockableCurrency}
To use LockableCurrency, it is necessary to define a
LockIdentifier.
const EXAMPLE_ID: LockIdentifier = *b"example ";
By using this EXAMPLE_ID, it is straightforward to define logic within the runtime to schedule
locking, unlocking, and extending existing locks.
#[pallet::weight(10_000)]
fn lock_capital(origin, amount: BalanceOf<T>) -> DispatchResultWithPostInfo {
	let user = ensure_signed(origin)?;

	T::Currency::set_lock(
		EXAMPLE_ID,
		&user,
		amount,
		WithdrawReasons::except(WithdrawReason::TransactionPayment),
	);

	Self::deposit_event(RawEvent::Locked(user, amount));
	Ok(().into())
}
Imbalances
Functions that alter balances return an object of the
Imbalance type to express
how much account balances have been altered in aggregate. This is useful in the context of state
transitions that adjust the total supply of the Currency type in question.
To manage this supply adjustment, the
OnUnbalanced handler is
often used. An example might look something like
#[weight = 10_000]
pub fn reward_funds(origin, to_reward: T::AccountId, reward: BalanceOf<T>) {
	let _ = ensure_signed(origin)?;

	let mut total_imbalance = <PositiveImbalanceOf<T>>::zero();

	let r = T::Currency::deposit_into_existing(&to_reward, reward).ok();
	total_imbalance.maybe_subsume(r);
	T::Reward::on_unbalanced(total_imbalance);

	let now = <frame_system::Module<T>>::block_number();
	Self::deposit_event(RawEvent::RewardFunds(to_reward, reward, now));
}
takeaway
The way we represent value in the runtime dictates both the security and flexibility of the underlying transactional system. Likewise, it is convenient to be able to take advantage of Rust's flexible trait system when building systems intended to rethink how we exchange information and value 🚀
Currency Imbalances
pallets/currency-imbalances
Imbalance
is used when tokens are burned or minted. In order to execute imbalance implement the
OnUnbalancedtrait.
In this pallet a specific amount of funds will be slashed from an account and award a specific
amount of funds to said specific account.
Slash funds
#[weight = 10_000]
pub fn slash_funds(origin, to_punish: T::AccountId, collateral: BalanceOf<T>) {
    let _ = ensure_signed(origin)?;

    let imbalance = T::Currency::slash_reserved(&to_punish, collateral).0;
    T::Slash::on_unbalanced(imbalance);

    let now = <frame_system::Module<T>>::block_number();
    Self::deposit_event(RawEvent::SlashFunds(to_punish, collateral, now));
}
Reward funds
#[weight = 10_000]
pub fn reward_funds(origin, to_reward: T::AccountId, reward: BalanceOf<T>) {
    let _ = ensure_signed(origin)?;

    let mut total_imbalance = <PositiveImbalanceOf<T>>::zero();

    let r = T::Currency::deposit_into_existing(&to_reward, reward).ok();
    total_imbalance.maybe_subsume(r);
    T::Reward::on_unbalanced(total_imbalance);

    let now = <frame_system::Module<T>>::block_number();
    Self::deposit_event(RawEvent::RewardFunds(to_reward, reward, now));
}
Generating Randomness
pallets/randomness
Randomness is useful in computer programs for everything from gambling, to generating DNA for
digital kitties, to selecting block authors. Randomness is hard to come by in deterministic
computers as explained at random.org. This is particularly
true in the context of a blockchain when all the nodes in the network must agree on the state of the
chain. Some techniques have been developed to address this problem including
RanDAO and
Verifiable Random Functions. Substrate
abstracts the implementation of a randomness source using the
Randomness trait, and
provides a few implementations. This recipe will demonstrate using the Randomness trait and two
concrete implementations.
Disclaimer
All of the randomness sources described here have limitations on their usefulness and security. This recipe shows how to use these randomness sources and makes an effort to explain their trade-offs. However, the author of this recipe is a blockchain chef, not a trained cryptographer. It is your responsibility to understand the security implications of using any of the techniques described in this recipe, before putting them to use. When in doubt, consult a trustworthy cryptographer.
The resources linked at the end of this recipe may be helpful in assessing the security and limitations of these randomness sources.
Randomness Trait
The randomness trait provides two methods, random_seed, and random, both of which provide a
pesudo-random value of the type specified in the traits type parameter.
random_seed
The random_seed method takes no parameters and returns a random seed which changes once per block.
If you call this method twice in the same block you will get the same result. This method is
typically not as useful as its counterpart.
random
The random method takes a byte array, &[u8], known as the subject, and uses the subject's bytes
along with the random seed described in the previous section to calculate a final random value.
Using a subject in this way allows pallet (or multiple pallets) to seek randomness in the same block
and get different results. The subject does not add entropy or security to the generation process,
it merely prevents each call from returning identical values.
Common values to use for a subject include:
- The block number
- The caller's accountId
- A Nonce
- A pallet-specific identifier
- A tuple containing several of the above
To bring a randomness source into scope, we include it in our configuration trait with the appropriate trait bound. This pallet, being a demo, will use two different sources. Using multiple sources is not necessary in practice.
pub trait Config: frame_system::Config {
	type Event: From<Event> + Into<<Self as frame_system::Config>::Event>;

	type RandomnessSource: Randomness<H256>;
}
We've provided the Output type as H256.
Consuming Randomness
Calling the randomness source from Rust code is straightforward. Our consume_randomness extrinsic
demonstrates consuming the raw random seed as well as a context-augmented random value. Try submitting the same extrinsic twice in the same block. The raw seed should be the same each time.
#[pallet::weight(10_000)]
pub fn consume_randomness(origin: OriginFor<T>) -> DispatchResultWithPostInfo {
	let _ = ensure_signed(origin)?;

	// Using a subject is recommended to prevent accidental re-use of the seed
	// (This does not add security or entropy)
	let subject = Self::encode_and_update_nonce();

	let random_seed = T::RandomnessSource::random_seed();
	let random_result = T::RandomnessSource::random(&subject);

	Self::deposit_event(Event::RandomnessConsumed(random_seed, random_result));
	Ok(().into())
}
Collective Coin Flipping
Substrate's Randomness Collective Flip pallet uses a safe mixing algorithm to generate randomness using the entropy of previous block hashes. Because it is dependent on previous blocks, it can take many blocks for the seed to change.
A naive randomness source based on block hashes would take the hash of the previous block and use it as a random seed. Such a technique has the significant disadvantage that the block author can preview the random seed, and choose to discard the block choosing a slightly modified block with a more desirable hash. This pallet is subject to similar manipulation by the previous 81 block authors rather than just the previous 1.
Although it may seem harmless, you should not hash the result of the randomness provided by the collective flip pallet. Secure hash functions satisfy the Avalance effect which means that each bit of input is equally likely to affect a given bit of the output. Hashing will negate the low-influence property provided by the pallet.
Babe VRF Output
Substrate's Babe pallet which is primarily responsible for managing validator rotation in Babe consensus, also collects the VRF outputs that Babe validators publish to demonstrate that they are permitted to author a block. These VRF outputs can be used to provide a random seed.
Because we are accessing the randomness via the Randomness trait, the calls look the same as
before.
let random_seed = T::BabeRandomnessSource::random_seed();
let random_result = T::BabeRandomnessSource::random(&subject);
In production networks, Babe VRF output is preferable to Collective Flip. Collective Flip provides essentially no real security.
Down the Rabbit Hole
As mentioned previously, there are many tradeoffs and security concerns to be aware of when using these randomness sources. If you'd like to get into the research, here are some jumping off points.
- http://www.cse.huji.ac.il/~nati/PAPERS/coll_coin_fl.pdf
- https://eccc.weizmann.ac.il/report/2018/140/
Tightly- and Loosely-Coupled Pallets
pallets/check-membership
The check-membership crate contains two pallets that solve the same problems in slightly different
ways. Both pallets implement a single dispatchable function that can only be successfully executed
by callers who are members of an
access control list. The job of maintaining the
access control list is abstracted away to another pallet. This pallet and the membership-managing
pallet can be coupled in two different ways which are demonstrated by the tight and loose variants
of the pallet.
Twin Pallets
Before we dive into the pallet code, let's talk a bit more about the structure of the crate in the
pallets/check-membership directory. This directory is a single Rust crate that contains two
pallets. The two pallets live in the pallets/check-membership/tight and
pallets/check-membership/loose directories. In the crate's main lib.rs we simply export each of
these variants of the pallet.
pub mod loose;
pub mod tight;
This allows us to demonstrate both techniques while keeping the closely related work in a single crate.
Controlling Access
While the primary learning objective of these twin pallets is understanding the way in which they are coupled to the membership-managing pallets, they also demonstrate the concept of an access control list, which we will investigate first.
It is often useful to designate some functions as permissioned and, therefore, accessible only to a
defined group of users. In this pallet, we check that the caller of the check_membership function
corresponds to a member of the permissioned set.
The loosely coupled variant looks like this.
/// Checks whether the caller is a member of the set of Account Ids provided by the
/// MembershipSource type. Emits an event if they are, and errors if not.
#[pallet::weight(10_000)]
pub fn check_membership(origin: OriginFor<T>) -> DispatchResultWithPostInfo {
	let caller = ensure_signed(origin)?;

	// Get the members from the `vec-set` pallet
	let members = T::MembershipSource::accounts();

	// Check whether the caller is a member
	ensure!(members.contains(&caller), Error::<T>::NotAMember);

	// If the previous call didn't error, then the caller is a member, so emit the event
	Self::deposit_event(Event::IsAMember(caller));
	Ok(().into())
}
Coupling Pallets
Each check-membership pallet actually contains very little logic. It has no storage of its own and
a single extrinsic that does the membership checking. All of the heavy lifting is abstracted away to
another pallet. There are two different ways that pallets can be coupled to one another and this
section investigates both.
Tight Coupling
Tightly coupling pallets is more explicit than loosely coupling them. When you are writing a pallet
that you want to tightly couple with some other pallet as a dependency, you explicitly specify the
name of the pallet on which you depend as a trait bound on the configuration trait of the pallet you
are writing. This is demonstrated in the tightly coupled variant of check-membership.
pub trait Config: frame_system::Config + vec_set::Trait {
	// --snip--
}
This pallet, and all pallets, are tightly coupled to
frame_system.
Supplying this trait bound means that the tightly coupled variant of check-membership pallet can
only be installed in a runtime that also has the vec-set pallet
installed. We also see the tight coupling in the pallet's Cargo.toml file, where vec-set is
listed by name.
vec-set = { path = '../vec-set', default-features = false }
To actually get the set of members, we have access to the getter function declared in vec-set.
// Get the members from the vec-set pallet
let members = vec_set::Module::<T>::members();
While tightly coupling pallets is conceptually simple, it has the disadvantage that it depends on a
specific implementation rather than an abstract interface. This makes the code more difficult to
maintain over time and is generally frowned upon. The tightly coupled version of check-membership
depends on exactly the vec-set pallet rather than a behavior such as managing a set of accounts.
Loose Coupling
Loose coupling solves the problem of coupling to a specific implementation. When loosely coupling to another pallet, you add an associated type to the pallet's configuration trait and ensure the supplied type implements the necessary behavior by specifying a trait bound.
pub trait Config: frame_system::Config {
	// --snip--

	/// A type that will supply a set of members to check access control against
	type MembershipSource: AccountSet<AccountId = Self::AccountId>;
}
Many pallets throughout the ecosystem are coupled to a token through the
Currencytrait.
Having this associated type means that the loosely coupled variant of the check-membership pallet
can be installed in any runtime that can supply it with a set of accounts to use as an access
control list. The code for the AccountSet trait lives in traits/account-set/src/lib.rs directory
and is quite short.
pub trait AccountSet {
	type AccountId;

	fn accounts() -> BTreeSet<Self::AccountId>;
}
We also see the loose coupling in the pallet's Cargo.toml file, where account-set is listed.
account-set = { path = '../../traits/account-set', default-features = false }
To actually get the set of members, we use the accounts method supplied by the trait.
// Get the members from the vec-set pallet
let members = T::MembershipSource::accounts();
Runtimes
A runtime represents the onchain application logic of a blockchain. They are typically written by composing FRAME pallets, but they can also be written directly. Learn about them in this section of the cookbook.
Runtime APIs
pallets/sum-storage
runtimes/api-runtime
Each Substrate node contains a runtime. The runtime contains the business logic of the chain. It defines what transactions are valid and invalid and determines how the chain's state changes in response to transactions. The runtime is compiled to Wasm to facilitate runtime upgrades. The "outer node", everything other than the runtime, does not compile to Wasm, only to native. The outer node is responsible for handling peer discovery, transaction pooling, block and transaction gossiping, consensus, and answering RPC calls from the outside world. While performing these tasks, the outer node sometimes needs to query the runtime for information, or provide information to the runtime. A Runtime API facilitates this kind of communication between the outer node and the runtime. In this recipe, we will write our own minimal runtime API.
Our Example
For this example, we will write a pallet called sum-storage with two storage items, both u32s.
#![allow(unused)]
fn main() {
decl_storage! {
	trait Store for Module<T: Config> as TemplateModule {
		Thing1 get(fn thing1): Option<u32>;
		Thing2 get(fn thing2): Option<u32>;
	}
}
}
Substrate already comes with a runtime API for querying storage values, which is why we can easily query our two storage values from a front-end. In this example we imagine that the outer node is interested in knowing the sum of the two values, rather than either individual value. Our runtime API will provide a way for the outer node to query the runtime for this sum. Before we define the actual runtime API, let's write a public helper function in the pallet to do the summing.
#![allow(unused)]
fn main() {
impl<T: Config> Module<T> {
	pub fn get_sum() -> u32 {
		Thing1::get() + Thing2::get()
	}
}
}
So far, nothing we've done is specific to runtime APIs. In the coming sections, we will use this helper function in our runtime API's implementation.
Defining the API
The first step in adding a runtime API to your runtime is defining its interface using a Rust trait.
This is done in the sum-storage/runtime-api/src/lib.rs file. This file can live anywhere you like,
but because it defines an API that is closely related to a particular pallet, it makes sense to
include the API definition in the pallet's directory.
The code to define the API is quite simple, and looks almost like any old Rust trait. The one
addition is that it must be placed in the
decl_runtime_apis! macro. This
macro allows the outer node to query the runtime API at specific blocks. Although this runtime API
only provides a single function, you may write as many as you like.
#![allow(unused)]
fn main() {
sp_api::decl_runtime_apis! {
	pub trait SumStorageApi {
		fn get_sum() -> u32;
	}
}
}
Implementing the API
With our pallet written and our runtime API defined, we may now implement the API for our runtime.
This happens in the main runtime aggregation file. In our case we've provided the api-runtime in
runtimes/api-runtime/src/lib.rs.
As with defining the API, implementing a runtime API looks similar to implementing any old Rust
trait with the exception that the implementation must go inside of the
impl_runtime_apis! macro. Every
runtime must use iml_runtime_apis! because the
Core API is required. We will add an
implementation for our own API alongside the others in this macro. Our implementation is
straight-forward as it merely calls the pallet's helper function that we wrote previously.
#![allow(unused)]
fn main() {
impl_runtime_apis! {
  // --snip--

  impl sum_storage_rpc_runtime_api::SumStorageApi<Block> for Runtime {
		fn get_sum() -> u32 {
			SumStorage::get_sum()
		}
	}
}
}
You may be wondering about the Block type parameter which is present here, but not in our
definition. This type parameter is added by the macros along with a few other features. All runtime
APIs have this type parameter to facilitate querying the runtime at arbitrary blocks. Read more
about this in the docs for
impl_runtime_apis!.
Calling the Runtime API
We've now successfully added a runtime API to our runtime. The outer node can now call this API to query the runtime for the sum of two storage values. Given a reference to a 'client' we can make the call like this.
#![allow(unused)]
fn main() {
let sum_at_block_fifty = client.runtime_api().get_sum(&50);
}
This recipe was about defining and implementing a custom runtime API. To see an example of calling this API in practice, see the recipe on custom RPCs, where we connect this runtime API to an RPC that can be called by an end user.
Transaction Fees
runtimes/weight-fee-runtime
Substrate provides the
transaction_payment pallet for
calculating and collecting fees for executing transactions. Fees are broken down into two
components:
- Byte fee - A fee proportional to the transaction's length in bytes. The proportionality constant
is a parameter in the
transaction_paymentpallet. - Weight fee - A fee calculated from the transaction's weight. Weights quantify the time spent executing the transaction. Learn more in the recipe on weights. The conversion doesn't need to be linear, although it often is. The same conversion function is applied across all transactions from all pallets in the runtime.
- Fee Multiplier - A multiplier for the computed fee, that can change as the chain progresses. This topic is not (yet) covered further in the recipes.
total_fee = transaction_length * length_fee + weight_to_fee(total_weight)
Setting the Parameters
Each of the parameters described above is set in the
transaction payment pallet's
configuration trait. For example, the super-runtime sets these parameters as follows.
src:
runtimes/super-runtime/src/lib.rs
parameter_types! {
	pub const TransactionByteFee: u128 = 1;
}

impl transaction_payment::Trait for Runtime {
	type Currency = balances::Module<Runtime>;
	type OnTransactionPayment = ();
	type TransactionByteFee = TransactionByteFee;
	type WeightToFee = IdentityFee<Balance>;
	type FeeMultiplierUpdate = ();
}
1 to 1 Conversion
In many cases converting weight to fees one-to-one, as shown above, will suffice and can be
accomplished with
IdentityFee. This
approach is also taken in the
node template.
It is also possible to provide a type that makes a more complex calculation. Any type that
implements
WeightToFeePolynomial
will suffice.
Linear Conversion
Another common way to convert weight to fees is linearly. When converting linearly, the weight is
multiplied by a constant coefficient to determine the fee to charge. This is demonstrated in the
weight-fee-runtime with the LinearWeightToFee struct.
We declare the struct with an associated type C, which will provide the coefficient.
pub struct LinearWeightToFee<C>(sp_std::marker::PhantomData<C>);
Then we implement WeightToFeePolynomial for it. When implementing this trait, your main job is to
return a set of
WeightToFeeCoefficients.
These coefficients can have integer and fractional parts and be positive or negative. In our
LinearWeightToFee there is a single integer coefficient supplied by the associated type.
impl<C> WeightToFeePolynomial for LinearWeightToFee<C>
where
	C: Get<Balance>,
{
	type Balance = Balance;

	fn polynomial() -> WeightToFeeCoefficients<Self::Balance> {
		let coefficient = WeightToFeeCoefficient {
			coeff_integer: C::get(),
			coeff_frac: Perbill::zero(),
			negative: false,
			degree: 1,
		};

		// Return a smallvec of coefficients. Order does not need to match degrees
		// because each coefficient has an explicit degree annotation.
		smallvec!(coefficient)
	}
}
This struct is reusable, and works with different coefficients. Using it looks like this.
parameter_types! {
	// Used with LinearWeightToFee conversion. Leaving this constant intact when using other
	// conversion techniques is harmless.
	pub const FeeWeightRatio: u128 = 1_000;

	// --snip--
}

impl transaction_payment::Trait for Runtime {

	// Convert dispatch weight to a chargeable fee.
	type WeightToFee = LinearWeightToFee<FeeWeightRatio>;

	// --snip--
}
Quadratic Conversion
More complex polynomials can also be used. When using complex polynomials, it is unlikely that your
logic will be reused among multiple chains, so it is generally not worth the overhead of making the
coefficients configurable. The QuadraticWeightToFee demonstrates a 2nd-degree polynomial with
hard-coded non-integer signed coefficients.
pub struct QuadraticWeightToFee;

impl WeightToFeePolynomial for QuadraticWeightToFee {
	type Balance = Balance;

	fn polynomial() -> WeightToFeeCoefficients<Self::Balance> {
		let linear = WeightToFeeCoefficient {
			coeff_integer: 2,
			coeff_frac: Perbill::from_percent(40),
			negative: true,
			degree: 1,
		};
		let quadratic = WeightToFeeCoefficient {
			coeff_integer: 3,
			coeff_frac: Perbill::zero(),
			negative: false,
			degree: 2,
		};

		// Return a smallvec of coefficients. Order does not need to match degrees
		// because each coefficient has an explicit degree annotation. In fact, any
		// negative coefficients should be saved for last regardless of their degree
		// because large negative coefficients will likely cause saturation (to zero)
		// if they happen early on.
		smallvec![quadratic, linear]
	}
}
Collecting Fees
Having calculated the amount of fees due, runtime authors must decide which asset the fees should be
paid in. A common choice is the use the
Balances pallet, but any type that
implements the Currency trait
can be used.
src:
runtimes/weight-fee-runtime/src/lib.rs
impl transaction_payment::Trait for Runtime {

	// A generic asset whose ID is stored in the generic_asset pallet's runtime storage
	type Currency = SpendingAssetCurrency<Self>;

	// --snip--
}
Consensus
Consensus is the part of the outer node that decides which blocks are in the real blockchain. Learn about it in this section of the cookbook.
Sha3 Proof of Work Algorithms
consensus/sha3-pow
Proof of Work is not a single consensus algorithm.
Rather it is a class of algorithms represented in Substrate by the
PowAlgorithm trait. Before we
can build a PoW node we must specify a concrete PoW algorithm by implementing this trait. In this
recipe we specify two concrete PoW algorithms, both of which are based on the
sha3 hashing algorithm.
Minimal Sha3 PoW
First we turn our attention to a minimal working implementation. This consensus engine is kept intentionally simple. It omits some features that make Proof of Work practical for real-world use such as difficulty adjustment.
Begin by creating a struct that will implement the PowAlgorithm Trait.
/// A minimal PoW algorithm that uses Sha3 hashing.
/// Difficulty is fixed at 1_000_000
#[derive(Clone)]
pub struct MinimalSha3Algorithm;
Because this is a minimal PoW algorithm, our struct can also be quite simple. In fact, it is a unit struct. A more complex PoW algorithm that interfaces with the runtime would need to hold a reference to the client. An example of this (on an older Substrate codebase) can be seen in Kulupu's RandomXAlgorithm.
Difficulty
The first function we must provide returns the difficulty of the next block to be mined. In our minimal sha3 algorithm, this function is quite simple. The difficulty is fixed. This means that as more mining power joins the network, the block time will become faster.
impl<B: BlockT<Hash = H256>> PowAlgorithm<B> for MinimalSha3Algorithm {
	type Difficulty = U256;

	fn difficulty(&self, _parent: B::Hash) -> Result<Self::Difficulty, Error<B>> {
		// Fixed difficulty hardcoded here
		Ok(U256::from(1_000_000))
	}

	// --snip--
}
Verification
Our PoW algorithm must also be able to verify blocks provided by other authors. We are first given the pre-hash, which is a hash of the block before the proof of work seal is attached. We are also given the seal, which testifies that the work has been done, and the difficulty that the block author needed to meet. This function first confirms that the provided seal actually meets the target difficulty, then it confirms that the seal is actually valid for the given pre-hash.
fn verify(
	&self,
	_parent: &BlockId<B>,
	pre_hash: &H256,
	_pre_digest: Option<&[u8]>,
	seal: &RawSeal,
	difficulty: Self::Difficulty,
) -> Result<bool, Error<B>> {
	// Try to construct a seal object by decoding the raw seal given
	let seal = match Seal::decode(&mut &seal[..]) {
		Ok(seal) => seal,
		Err(_) => return Ok(false),
	};

	// See whether the hash meets the difficulty requirement. If not, fail fast.
	if !hash_meets_difficulty(&seal.work, difficulty) {
		return Ok(false);
	}

	// Make sure the provided work actually comes from the correct pre_hash
	let compute = Compute {
		difficulty,
		pre_hash: *pre_hash,
		nonce: seal.nonce,
	};

	if compute.compute() != seal {
		return Ok(false);
	}

	Ok(true)
}
Realistic Sha3 PoW
Having understood the fundamentals, we can now build a more realistic sha3 algorithm. The primary difference here is that this algorithm will fetch the difficulty from the runtime via a runtime api. This change allows the runtime to dynamically adjust the difficulty based on block time. So if more mining power joins the network, the diffculty adjusts, and the blocktime remains constant.
Defining the Sha3Algorithm Struct
We begin as before by defining a struct that will implement the PowAlgorithm trait. Unlike before,
this struct must hold a reference to the
Client so it can call the
appropriate runtime APIs.
/// A complete PoW Algorithm that uses Sha3 hashing.
/// Needs a reference to the client so it can grab the difficulty from the runtime.
pub struct Sha3Algorithm<C> {
	client: Arc<C>,
}
Next we provide a new method for conveniently creating instances of our new struct.
impl<C> Sha3Algorithm<C> {
	pub fn new(client: Arc<C>) -> Self {
		Self { client }
	}
}
And finally we manually implement Clone. We cannot derive clone as we did for the
MinimalSha3Algorithm.
// Manually implement clone. Deriving doesn't work because
// it'll derive impl<C: Clone> Clone for Sha3Algorithm<C>. But C in practice isn't Clone.
impl<C> Clone for Sha3Algorithm<C> {
	fn clone(&self) -> Self {
		Self::new(self.client.clone())
	}
}
It isn't critical to understand why the manual
Cloneimplementation is necessary, just that it is necessary.
Implementing the PowAlgorithm trait
As before we implement the PowAlgorithm trait for our Sha3Algorithm. This time we supply more
complex trait bounds to ensure that the encapsulated client actually provides
the DifficultyAPI necessary
to fetch the PoW difficulty from the runtime.
impl<B: BlockT<Hash = H256>, C> PowAlgorithm<B> for Sha3Algorithm<C>
where
	C: ProvideRuntimeApi<B>,
	C::Api: DifficultyApi<B, U256>,
{
	type Difficulty = U256;

	// --snip
}
The implementation of PowAlgorithm's difficulty function, no longer returns a fixed value, but
rather calls into the runtime API which is guaranteed to exist because of the trait bounds. It also
maps any errors that may have occurred when using the API.
fn difficulty(&self, parent: B::Hash) -> Result<Self::Difficulty, Error<B>> {
	let parent_id = BlockId::<B>::hash(parent);
	self.client
		.runtime_api()
		.difficulty(&parent_id)
		.map_err(|err| {
			sc_consensus_pow::Error::Environment(
				format!("Fetching difficulty from runtime failed: {:?}", err)
			)
		})
}
The verify function is unchanged from the MinimalSha3Algorithm implementation.
Nodes
The "outer node" is the part of a Substrate chain that is not in the runtime. It handles networking, gossip, transaction queueing, and consensus. Learn about it in this section of the cookbook.
Kitchen Node (Instant Seal)
nodes/kitchen-node
This recipe demonstrates a general purpose Substrate node that supports most of the recipes' runtimes, and uses Instant Seal consensus.
The kitchen node serves as the first point of entry for most aspiring chefs when they first encounter the recipes. By default it builds with the super-runtime, but it can be used with most of the runtimes in the recipes. Changing the runtime is described below. It features the instant seal consensus which is perfect for testing and iterating on a runtime.
Installing a Runtime
Cargo Dependency
The Cargo.toml file specifies the runtime as a dependency. The file imports the super-runtime, and
has dependencies on other runtimes commented out.
# Common runtime configured with most Recipes pallets.
runtime = { package = "super-runtime", path = "../../runtimes/super-runtime" }

# Runtime with custom weight and fee calculation.
# runtime = { package = "weight-fee-runtime", path = "../../runtimes/weight-fee-runtime"}

# Runtime with off-chain worker enabled.
# To use this runtime, compile the node with `ocw` feature enabled,
#   `cargo build --release --features ocw`.
# runtime = { package = "ocw-runtime", path = "../../runtimes/ocw-runtime" }

# Runtime with custom runtime-api (custom API only used in rpc-node)
#runtime = { package = "api-runtime", path = "../../runtimes/api-runtime" }
Installing a different runtime in the node is just a matter of commenting out the super-runtime
line, and enabling another one. Try the weight-fee runtime for example. Of course cargo will
complain if you try to import two crates under the name runtime.
Building a Service with the Runtime
With a runtime of our choosing listed among our dependencies, we can begin wiring the node's Service together. The service is the part of the node that coordinates communication between all other parts.
We begin by invoking the
native_executor_instance! macro.
This creates an executor which is responsible for executing transactions in the runtime and
determining whether to run the native or Wasm version of the runtime.
native_executor_instance!(
	pub Executor,
	runtime::api::dispatch,
	runtime::native_version,
);
The remainder of the file will create the individual components of the node and connect them together. Most of this code is boilerplate taken from the Substrate Node Template. We will focus specifically on the unique consensus engine used here.
Instant Seal Consensus
The instant seal consensus engine, and its cousin the manual seal consensus engine, are both
included in the same
sc-consensus-manual-seal crate. Instant seal
simply authors a new block whenever a new transaction is available in the queue. This is similar to
Truffle Suite's Ganache in the Ethereum ecosystem, but
without the UI.
The Cargo Dependencies
Installing the instant seal engine has three dependencies whereas the runtime had only one.
sc-consensus = '0.9'
sc-consensus-manual-seal = '0.9'
sp-consensus = '0.9'
The Import Queue
We begin in new_partial by creating a manual-seal import queue. Both instant seal and manual seal use the same import queue. This process is similar to, but simpler than, the
basic-pow import queue.
let import_queue = sc_consensus_manual_seal::import_queue(
	Box::new(client.clone()),
	&task_manager.spawn_handle(),
	config.prometheus_registry(),
);
The Proposer
Now we pick up in the new_full function. All of the non-boilerplate code in this portion is executed only if the node is an authority. Create a
Proposer which will be
responsible for creating proposing blocks in the chain.
let proposer = sc_basic_authorship::ProposerFactory::new(
	task_manager.spawn_handle(),
	client.clone(),
	transaction_pool.clone(),
	prometheus_registry.as_ref(),
);
The Authorship Task
As with every authoring engine, instant seal needs to be run as an async authoring task.
let authorship_future = sc_consensus_manual_seal::run_instant_seal(
	InstantSealParams {
		block_import: client.clone(),
		env: proposer,
		client,
		pool: transaction_pool.pool().clone(),
		select_chain,
		consensus_data_provider: None,
		inherent_data_providers,
	}
);
With the future created, we can now kick it off using the TaskManager's
spawn_essential_handle method.
task_manager.spawn_essential_handle().spawn_blocking("instant-seal", authorship_future);
Manual Seal Consensus
The instant seal consensus engine used in this node is built on top of a similar manual seal engine. Manual seal listens for commands to come over the RPC instructing it to author blocks. To see this engine in use, check out the RPC node recipe.
Custom RPCs
nodes/custom-rpc
runtimes/api-runtime
Remote Procedure Calls, or RPCs, are a way for an external program (eg. a frontend) to communicate with a Substrate node. They are used for checking storage values, submitting transactions, and querying the current consensus authorities. Substrate comes with several default RPCs. In many cases it is useful to add custom RPCs to your node. In this recipe, we will add three custom RPCs to our node. The first is trivial, the second calls into a custom runtime API, and the third interfaces with consensus.
The RPC Extensions Builder
In order to connect custom RPCs you must provide a function known as an "RPC extension builder". This function takes a parameter for whether the node should deny unsafe RPC calls, and returns an IoHandler that the node needs to create a json RPC. For context, read more at RpcExtensionBuilder trait API doc.
let rpc_extensions_builder = {
	let client = client.clone();
	let pool = transaction_pool.clone();
	Box::new(move |deny_unsafe, _| {
		let deps = crate::rpc::FullDeps {
			client: client.clone(),
			pool: pool.clone(),
			deny_unsafe,
			command_sink: command_sink.clone(),
		};

		crate::rpc::create_full(deps)
	})
};
This code is mostly boilerplate and can be reused. The one difference that you will encounter in your own node is the parameters that you pass. Here we've passed four parameters:
client- will be used in our second RPC- The transaction
pool- we will not actually use it but many RPCs do deny_unsafe- whether to deny unsafe callscommands_sink- will be used in our third RPC
With this builder function out of the way we can begin attaching our actual RPC endpoints.
The Silly RPC
We'll begin by defining a simple RPC called "silly rpc" which just returns integers. A Hello world of sorts.
Defining the Silly RPC
Every RPC that the node will use must be defined in a trait. In the
nodes/rpc-node/src/silly_rpc.rs file, we define a basic rpc as
#![allow(unused)]
fn main() {
#[rpc]
pub trait SillyRpc {
	#[rpc(name = "silly_seven")]
	fn silly_7(&self) -> Result<u64>;

	#[rpc(name = "silly_double")]
	fn silly_double(&self, val: u64) -> Result<u64>;
}
}
This definition defines two RPC methods called silly_seven and silly_double. Each RPC method must
take a &self reference and must return a Result. Next, we define a struct that implements this
trait.
#![allow(unused)]
fn main() {
pub struct Silly;

impl SillyRpc for Silly {
	fn silly_7(&self) -> Result<u64> {
		Ok(7)
	}

	fn silly_double(&self, val: u64) -> Result<u64> {
		Ok(2 * val)
	}
}
}
Finally, to make the contents of this new file usable, we need to add a line in our main.rs.
#![allow(unused)]
fn main() {
mod silly_rpc;
}
Including the Silly RPC
With our RPC written, we're ready to extend our IoHandler with it. We begin with a few dependencies in our
rpc-node's Cargo.toml.
jsonrpc-core = "15.0"
jsonrpc-core-client = "15.0"
jsonrpc-derive = "15.0"
sc-rpc = '3.0'
Now we're ready to write the create_full function we referenced from our service. The function is quoted in its entirety below. This code is taken from nodes/rpc-node/src/rpc.rs.
pub fn create_full<C, P>(
	deps: FullDeps<C, P>,
) -> jsonrpc_core::IoHandler<sc_rpc::Metadata> where
	// --snip--
{

	let mut io = jsonrpc_core::IoHandler::default();

	// Add a silly RPC that returns constant values
	io.extend_with(crate::silly_rpc::SillyRpc::to_delegate(
		crate::silly_rpc::Silly {},
	));

	// --snip--

	io
}
These few lines extend our node with the Silly RPC.
Calling the Silly RPC
Once your node is running, you can test the RPC by calling it with any client that speaks json RPC.
One widely available option is curl.
$ curl http://localhost:9933 -H "Content-Type:application/json;charset=utf-8" -d   '{
     "jsonrpc":"2.0",
      "id":1,
      "method":"silly_seven",
      "params": []
    }'
To which the RPC responds
{"jsonrpc":"2.0","result":7,"id":1}
You may have noticed that our second RPC takes a parameter, the value to double. You can supply this
parameter by including its in the params list. For example:
$ curl http://localhost:9933 -H "Content-Type:application/json;charset=utf-8" -d   '{
     "jsonrpc":"2.0",
      "id":1,
      "method":"silly_double",
      "params": [7]
    }'
To which the RPC responds with the doubled parameter
{"jsonrpc":"2.0","result":14,"id":1}
RPC to Call a Runtime API
The silly RPC demonstrates the fundamentals of working with RPCs in Substrate. Nonetheless, most
RPCs will go beyond what we've learned so far and actually interacts with other parts of the node.
In this second example, we will include an RPC that calls into the sum-storage runtime API from
the runtime API recipe. While it isn't strictly necessary to understand what the
runtime API does, reading that recipe may provide helpful context.
Defining the Sum Storage RPC
Because this RPC's behavior is closely related to a specific pallet, we've chosen to define the RPC
in the pallet's directory. In this case the RPC is defined in pallets/sum-storage/rpc. So rather
than using the mod keyword as we did before, we must include this RPC definition in the node's
Cargo.toml file.
sum-storage-rpc = { path = "../../pallets/sum-storage/rpc" }
Defining the RPC interface is similar to before, but there are a few differences worth noting.
First, the struct that implements the RPC needs a reference to the client. This is necessary so we
can actually call into the runtime. Second the struct is generic over the BlockHash type. This is
because it will call a runtime API, and runtime APIs must always be called at a specific block.
#![allow(unused)]
fn main() {
#[rpc]
pub trait SumStorageApi<BlockHash> {
	#[rpc(name = "sumStorage_getSum")]
	fn get_sum(
		&self,
		at: Option<BlockHash>
	) -> Result<u32>;
}

/// A struct that implements the `SumStorageApi`.
pub struct SumStorage<C, M> {
	client: Arc<C>,
	_marker: std::marker::PhantomData<M>,
}

impl<C, M> SumStorage<C, M> {
	/// Create new `SumStorage` instance with the given reference to the client.
	pub fn new(client: Arc<C>) -> Self {
		Self { client, _marker: Default::default() }
	}
}
}
The RPC's implementation is also similar to before. The additional syntax here is related to calling the runtime at a specific block, as well as ensuring that the runtime we're calling actually has the correct runtime API available.
#![allow(unused)]
fn main() {
impl<C, Block> SumStorageApi<<Block as BlockT>::Hash>
	for SumStorage<C, Block>
where
	Block: BlockT,
	C: Send + Sync + 'static,
	C: ProvideRuntimeApi,
	C: HeaderBackend<Block>,
	C::Api: SumStorageRuntimeApi<Block>,
{
	fn get_sum(
		&self,
		at: Option<<Block as BlockT>::Hash>
	) -> Result<u32> {

		let api = self.client.runtime_api();
		let at = BlockId::hash(at.unwrap_or_else(||
			// If the block hash is not supplied assume the best block.
			self.client.info().best_hash
		));

		let runtime_api_result = api.get_sum(&at);
		runtime_api_result.map_err(|e| RpcError {
			code: ErrorCode::ServerError(9876), // No real reason for this value
			message: "Something wrong".into(),
			data: Some(format!("{:?}", e).into()),
		})
	}
}
}
Installing the Sum Storage RPC
To install this RPC , we expand the existing create_full function from rpc.rs.
#![allow(unused)]
fn main() {
io.extend_with(sum_storage_rpc::SumStorageApi::to_delegate(
	sum_storage_rpc::SumStorage::new(client),
));
}
Using RPC Parameters
This RPC takes a parameter ,at, whose type is Option<_>. We may call this RPC by omitting the
optional parameter entirely. In this case the implementation provides a default value of the best
block.
$ curl http://localhost:9933 -H "Content-Type:application/json;charset=utf-8" -d   '{
     "jsonrpc":"2.0",
      "id":1,
      "method":"sumStorage_getSum",
      "params": []
    }'
We may also call the RPC by providing a block hash. One easy way to get a block hash to test this call is by copying it from the logs of a running node.
$ curl http://localhost:9933 -H "Content-Type:application/json;charset=utf-8" -d   '{
     "jsonrpc":"2.0",
      "id":1,
      "method":"sumStorage_getSum",
      "params": ["0x87b2e4b93e74d2f06a0bde8de78c9e2a9823ce559eb5e3c4710de40a1c1071ac"]
    }'
As an exercise, change the storage values and confirm that the RPC provides the correct updated sum. Then call the RPC at an old block and confirm you get the old sum.
Polkadot JS API
Many frontends interact with Substrate nodes through Polkadot JS API. While the Recipes does not
strive to document that project, we have included a snippet of javascript for interacting with these first two
custom RPCs in the nodes/rpc-node/js directory.
The Manual Seal RPC
Our third and final example RPC will interact with consensus. Specifically, it will tell the consensus engine when to author and finalize blocks. The API for this RPC if defined in Substrate in the ManualSealApi Trait.
Installing the Manual Seal RPC
The previous RPC needed a reference to the client to call into the runtime. Likewise, this RPC needs a command stream to send messages to the actual consensus engine. This recipe does not cover installing the manual seal engine, but it is nearly identical to the instant seal engine used in the Kitchen Node.
To install the RPC endpoint, we do exactly as we have before, and extend the create_full function in rpc.rs
io.extend_with(
	// We provide the rpc handler with the sending end of the channel to allow the rpc
	// send EngineCommands to the background block authorship task.
	ManualSealApi::to_delegate(ManualSeal::new(command_sink)),
);
Using Manual Seal
Once your node is running, you will see that it just sits there idly. It will accept transactions to
the pool, but it will not author blocks on its own. In manual seal, the node does not author a block
until we explicitly tell it to. We can tell it to author a block by calling the engine_createBlock
RPC.
The easiest way is to use Apps's Developer -> RPC Calls tab.
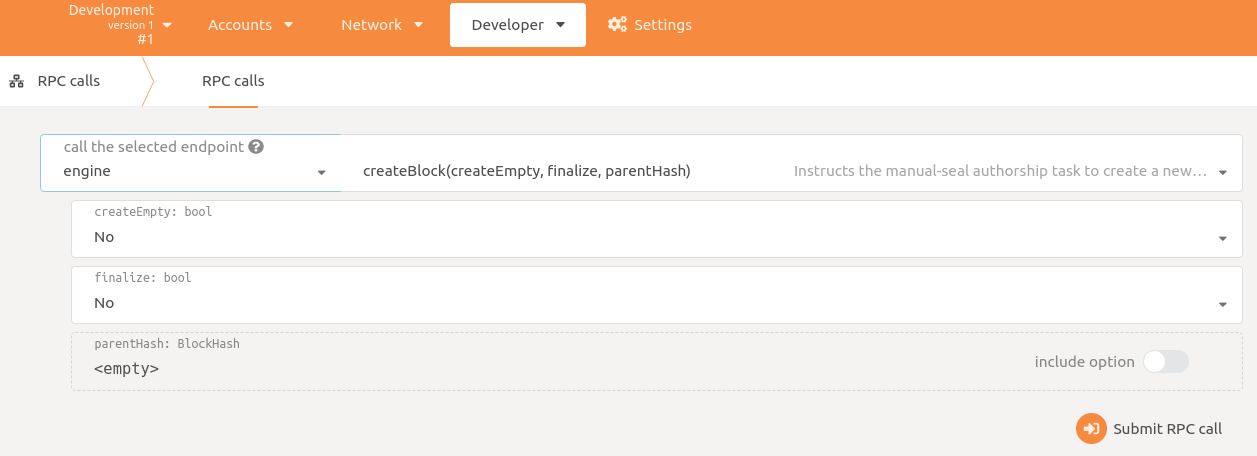
It can also be called using curl as described previously.
$ curl http://localhost:9933 -H "Content-Type:application/json;charset=utf-8" -d   '{
     "jsonrpc":"2.0",
      "id":1,
      "method":"engine_createBlock",
      "params": [true, false, null]
    }'
This call takes three parameters, each of which are worth exploring.
Create Empty
create_empty is a Boolean value indicating whether empty blocks may be created. Setting
create-empty to true does not mean that an empty block will necessarily be created. Rather it
means that the engine should go ahead creating a block even if no transaction are present. If
transactions are present in the queue, they will be included regardless of create_empty's value.'
Finalize
finalize is a Boolean indicating whether the block (and its ancestors, recursively) should be
finalized after creation. Manually controlling finality is interesting, but also dangerous. If you
attempt to author and finalize a block that does not build on the best finalized chain, the block
will not be imported. If you finalize one block in one node, and a conflicting block in another
node, you will cause a safety violation when the nodes synchronize.
Parent Hash
parent_hash is an optional hash of a block to use as a parent. To set the parent, use the format
"0x0e0626477621754200486f323e3858cd5f28fcbe52c69b2581aecb622e384764". To omit the parent, use
null. When the parent is omitted the block is built on the current best block. Manually specifying
the parent is useful for constructing fork scenarios and demonstrating chain reorganizations.
Manually Finalizing Blocks
In addition to finalizing blocks while creating them, they can be finalized later by using the
second provided RPC call, engine_finalizeBlock.
$ curl http://localhost:9933 -H "Content-Type:application/json;charset=utf-8" -d   '{
     "jsonrpc":"2.0",
      "id":1,
      "method":"engine_finalizeBlock",
      "params": ["0x0e0626477621754200486f323e3858cd5f28fcbe52c69b2581aecb622e384764", null]
    }'
The two parameters are:
- The hash of the block to finalize.
- A Justification. TODO what is the justification and why might I want to use it?
Basic Proof of Work
nodes/basic-pow
The basic-pow node demonstrates how to wire up a custom consensus engine into the Substrate
Service. It uses a minimal proof of work consensus engine to reach agreement over the blockchain. It
will teach us many useful aspects of dealing with consensus and prepare us to understand more
advanced consensus engines in the future. In particular we will learn about:
- Substrate's
BlockImporttrait - Substrate's import pipeline
- Structure of a typical Substrate Service
- Configuration of
InherentDataProviders
The Structure of a Node
A Substrate node has two parts. An outer part that is responsible for gossiping transactions and blocks, handling rpc requests, and reaching consensus. And a runtime that is responsible for the business logic of the chain. This architecture diagram illustrates the distinction.
In principle, the consensus engine (part of the outer node) is agnostic to the runtime that is used with it. But in practice, most consensus engines will require the runtime to provide certain runtime APIs that affect the engine. For example, Aura and Babe query the runtime for the set of validators. A more real-world PoW consensus would query the runtime for the block difficulty. Additionally, some runtimes rely on the consensus engine to provide pre-runtime digests. For example, runtimes that include the Babe pallet expect a pre-runtime digest containing information about the current babe slot.
In this recipe we will avoid those practical complexities by using the Minimal Sha3 Proof of Work consensus engine, which is truly isolated from the runtime. This node works with most of the recipes' runtimes, and has the super runtime installed by default.
The Substrate Service
The Substrate Service is the main
coordinator of the various parts of a Substrate node, including consensus. The service is large and
takes many parameters, so in each node, it is put together in a dedicated src/service.rs file.
The particular part of the service that is relevant here is
ImportQueue.
Here we construct an instance of the
PowBlockImport struct,
providing it with references to our client, our MinimalSha3Algorithm, and some other necessary
data.
let pow_block_import = sc_consensus_pow::PowBlockImport::new(
	client.clone(),
	client.clone(),
	sha3pow::MinimalSha3Algorithm,
	0, // check inherents starting at block 0
	select_chain.clone(),
	inherent_data_providers.clone(),
	can_author_with,
);

let import_queue = sc_consensus_pow::import_queue(
	Box::new(pow_block_import.clone()),
	None,
	sha3pow::MinimalSha3Algorithm,
	inherent_data_providers.clone(),
	&task_manager.spawn_handle(),
	config.prometheus_registry(),
)?;
Once the PowBlockImport is constructed, we can use it to create an actual import queue that the
service will use for importing blocks into the client.
The Block Import Pipeline
You may have noticed that when we created the PowBlockImport we gave it two separate references to
the client. The second reference will always be to a client. But the first is interesting. The
rustdocs tell us
that the first parameter is inner: BlockImport<B, Transaction = TransactionFor<C, B>>. Why would a
block import have a reference to another block import? Because the "block import pipeline" is
constructed in an onion-like fashion, where one layer of block import wraps the next. Learn more
about this pattern in the knowledgebase article on the
block import pipeline.
Inherent Data Providers
Both the BlockImport and the import_queue are given an instance called inherent_data_providers.
This object is created in a helper function defined at the beginning of service.rs
pub fn build_inherent_data_providers() -> Result<InherentDataProviders, ServiceError> {
	let providers = InherentDataProviders::new();

	providers
		.register_provider(sp_timestamp::InherentDataProvider)
		.map_err(Into::into)
		.map_err(sp_consensus::error::Error::InherentData)?;

	Ok(providers)
}
Anything that implements the
ProvideInherentData trait
may be used here. The block authoring logic must supply all inherents that the runtime expects. In
the case of this basic-pow chain, that is just the
TimestampInherentData
expected by the timestamp pallet. In order
to register other inherents, you would call register_provider multiple times, and map errors
accordingly.
Mining
We've already implemented a mining algorithm as part of our
MinimalSha3Algorithm, but we haven't yet told our service to actually
mine with that algorithm. This is our last task in the new_full function.
let proposer = sc_basic_authorship::ProposerFactory::new(
	task_manager.spawn_handle(),
	client.clone(),
	transaction_pool,
	prometheus_registry.as_ref(),
);

let (_worker, worker_task) = sc_consensus_pow::start_mining_worker(
	Box::new(pow_block_import),
	client,
	select_chain,
	MinimalSha3Algorithm,
	proposer,
	network.clone(),
	None,
	inherent_data_providers,
	// time to wait for a new block before starting to mine a new one
	Duration::from_secs(10),
	// how long to take to actually build the block (i.e. executing extrinsics)
	Duration::from_secs(10),
	can_author_with,
);
We begin by testing whether this node participates in consensus, which is to say we check whether
the user wants the node to act as a miner. If this node is to be a miner, we gather references to
various parts of the node that the
start_mining_worker function requires.
With the worker built, we let the task manager spawn it.
task_manager
	.spawn_essential_handle()
	.spawn_blocking("pow", worker_task);
The Light Client
The last thing in the service.rs file is constructing the
light client's service. This code is quite similar
to the construction of the full service.
Note of Finality
If we run the basic-pow node now, we see in console logs, that the finalized block always remains
at 0.
...
2020-03-22 12:50:09 Starting consensus session on top of parent 0x85811577d1033e918b425380222fd8c5aef980f81fa843d064d80fe027c79f5a
2020-03-22 12:50:09 Imported #189 (0x8581…9f5a)
2020-03-22 12:50:09 Prepared block for proposing at 190 [hash: 0xdd83ba96582acbed59aacd5304a9258962d1d4c2180acb8b77f725bd81461c4f; parent_hash: 0x8581…9f5a; extrinsics (1): [0x77a5…f7ad]]
2020-03-22 12:50:10 Idle (1 peers), best: #189 (0x8581…9f5a), finalized #0 (0xff0d…5cb9), ⬇ 0.2kiB/s ⬆ 0.4kiB/s
2020-03-22 12:50:15 Idle (1 peers), best: #189 (0x8581…9f5a), finalized #0 (0xff0d…5cb9), ⬇ 0 ⬆ 0
This is expected because Proof of Work is a consensus mechanism with probabilistic finality. This means a block is never truly finalized and can always be reverted. The further behind the blockchain head a block is, the less likely it is going to be reverted.
Hybrid Consensus
nodes/hybrid-consensus
This recipe demonstrates a Substrate-based node that employs hybrid consensus. Specifically, it uses Sha3 Proof of Work to dictate block authoring, and the Grandpa finality gadget to provide deterministic finality. The minimal proof of work consensus lives entirely outside of the runtime while the grandpa finality obtains its authorities from the runtime via the GrandpaAPI. Understanding this recipe requires familiarity with Substrate's block import pipeline.
The Block Import Pipeline
Substrate's block import pipeline is structured like an onion in the sense that it is layered. A Substrate node can compose pieces of block import logic by wrapping block imports in other block imports. In this node we need to ensure that blocks are valid according to both Pow and grandpa. So we will construct a block import for each of them and wrap one with the other. The end of the block import pipeline is always the client, which contains the underlying database of imported blocks. Learn more about the block import pipeline in the Substrate knowledgebase.
We begin by creating the block import for grandpa. In addition to the block import itself, we get
back a grandpa_link. This link is a channel over which the block import can communicate with the
background task that actually casts grandpa votes. The
details of the grandpa protocol
are beyond the scope of this recipe.
let (grandpa_block_import, grandpa_link) = sc_finality_grandpa::block_import(
	client.clone(),
	&(client.clone() as std::sync::Arc<_>),
	select_chain.clone(),
)?;
With the grandpa block import created, we can now create the PoW block import. The Pow block import is the outer-most layer of the block import onion and it wraps the grandpa block import.
let pow_block_import = sc_consensus_pow::PowBlockImport::new(
	grandpa_block_import,
	client.clone(),
	sha3pow::MinimalSha3Algorithm,
	0, // check inherents starting at block 0
	select_chain.clone(),
	inherent_data_providers.clone(),
	can_author_with,
);
The Import Queue
With the block imports setup, we can proceed to creating the import queue. We make it using PoW's
import_queue helper function. Notice that it requires the entire block import pipeline which we
refer to as pow_block_import because PoW is the outermost layer.
let import_queue = sc_consensus_pow::import_queue(
	Box::new(pow_block_import.clone()),
	None,
	sha3pow::MinimalSha3Algorithm,
	inherent_data_providers.clone(),
	&task_manager.spawn_handle(),
	config.prometheus_registry(),
)?;
Spawning the PoW Authorship Task
Any node that is acting as an authority, typically called "miners" in the PoW context, must run a mining worker that is spawned by the task manager.
let (_worker, worker_task) = sc_consensus_pow::start_mining_worker(
	Box::new(pow_block_import),
	client,
	select_chain,
	MinimalSha3Algorithm,
	proposer,
	network.clone(),
	None,
	inherent_data_providers,
	// time to wait for a new block before starting to mine a new one
	Duration::from_secs(10),
	// how long to take to actually build the block (i.e. executing extrinsics)
	Duration::from_secs(10),
	can_author_with,
);

task_manager
	.spawn_essential_handle()
	.spawn_blocking("pow", worker_task);
Spawning the Grandpa Task
Grandpa is not CPU intensive, so we will use a standard async worker to listen to and cast
grandpa votes. We begin by creating a grandpa
Config.
let grandpa_config = sc_finality_grandpa::Config {
	gossip_duration: Duration::from_millis(333),
	justification_period: 512,
	name: None,
	observer_enabled: false,
	keystore: Some(keystore_container.sync_keystore()),
	is_authority,
};
We can then use this config to create an instance of
GrandpaParams.
let grandpa_config = sc_finality_grandpa::GrandpaParams {
	config: grandpa_config,
	link: grandpa_link,
	network,
	telemetry_on_connect: telemetry_connection_notifier.map(|x| x.on_connect_stream()),
	voting_rule: sc_finality_grandpa::VotingRulesBuilder::default().build(),
	prometheus_registry,
	shared_voter_state: sc_finality_grandpa::SharedVoterState::empty(),
};
With the parameters established, we can now create and spawn the authorship future.
task_manager.spawn_essential_handle().spawn_blocking(
	"grandpa-voter",
	sc_finality_grandpa::run_grandpa_voter(grandpa_config)?
);
Constraints on the Runtime
Runtime APIs
Grandpa relies on getting its authority sets from the runtime via the
GrandpaAPI. So trying to build
this node with a runtime that does not provide this API will fail to compile. For that reason, we
have included the dedicated minimal-grandpa-runtime.
The opposite is not true, however. A node that does not require grandpa may use the
minimal-grandpa-runtime successfully. The unused GrandpaAPI will remain as a harmless vestige in
the runtime.